1. GitLab简介
GitLab是GitLab公司开发的基于Rails的开源存储库管理器。它是一个基于Web的git存储库管理器,允许团队协作编写、测试和部署应用程序。GitLab提供了多种功能,包括wiki、问题跟踪、代码审查和活动源。GitLab Inc提供5种产品:
- Gitlab CE(社区版):自托管和免费,社区论坛的支持。
- Gitlab EE(企业版):自托管和付费,附带其他功能。
- Gitlab JH(企业级中国发行版):极狐,自托管和付费,附带其他功能。
- GitLab.com:SaaS和免费。
- GitLab.io:由GitLab Inc.管理的私有GitLab实例。
在本文中,我们将在具有2GB RAM的CentOS7服务器上逐步安装GitLab CE(Community Edition),服务器IP为192.168.56.103。
参考文档:
- How to Install and Configure GitLab CE on CentOS 7
- How to Install and Configure GitLab on CentOS 7
- CentOS 7 搭建CA认证中心实现https取证
2. 环境准备
首先安装GitLab依赖的相关软件。
1、软件安装
1 | yum -y install curl policycoreutils openssh-server openssh-clients postfix |
2、postfix设置开机自启动
1 | systemctl start postfix |
3. 安装GitLab
1、添加GitLab CE repository
1 | curl -sS https://packages.gitlab.com/install/repositories/gitlab/gitlab-ce/script.rpm.sh | sudo bash |
2、安装gitlab
1 | yum -y install gitlab-ce |
软件642M,需要下载一会,耐心等待,安装完成会出现提示。
3、配置gitlab url
1 | vim /etc/gitlab/gitlab.rb |
修改external_url为:
1 | external_url 'http://gitlab.voidking.com' |
这个配置的作用,当用户在gitlab项目页面点击Clone时,展示出的URL为 http://gitlab.voidking.com/<group>/<project>.git
4、使gitlab配置生效
1 | gitlab-ctl reconfigure |
但是,这个命令执行时间特别久,因此建议在安装的时候就指定external_url:
1 | EXTERNAL_URL="http://gitlab.voidking.com" yum -y install gitlab-ce |
5、开放端口
1 | firewall-cmd --add-port=80/tcp --permanent |
6、测试访问
已知gitlab主机IP为 192.169.56.103 ,浏览器访问 http://192.169.56.103 ,即可跳转到gitlab登录页面。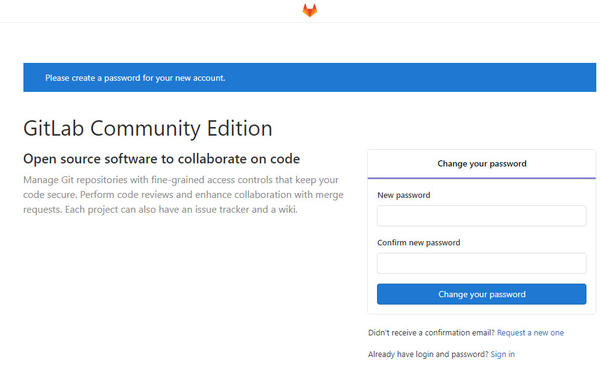
首次登录会提示重新修改密码。修改密码之后,使用 root 用户登录,即可进入 dashboard 管理页面。
4. 通过域名访问GitLab
4.1. 单机配置hosts
修改同一局域网内某台设备的 /etc/hosts,添加:
1 | 192.168.56.103 gitlab.voidking.com |
然后,这台设备就可以通过域名 http://gitlab.voidking.com 访问gitlab服务了。
4.2. 本地DNS配置域名解析
本地DNS配置域名解析:gitlab.voidking.com -> 192.168.56.103
然后,同一局域网内所有使用本地DNS的设备就可以通过域名 http://gitlab.voidking.com 访问gitlab服务了。
5. 使用GitLab
1、创建项目
Create a Project,Project name填入voidking,选择Public,勾选Initialize repository with a README。
2、clone项目
1 | git config --global http.sslVerify false |
3、上传代码
1 | # 添加test.txt文件 |
查看项目,代码已经上传成功。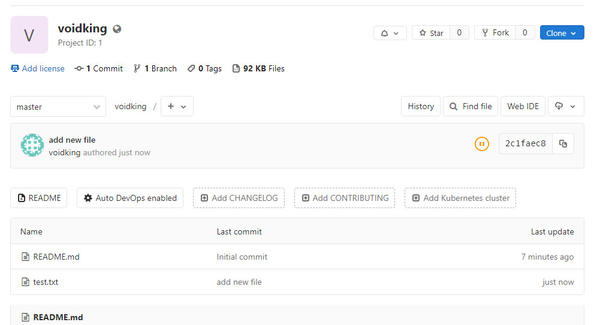
6. 配置HTTPS访问GitLab
6.1. 生成域名证书和DHPARAM证书
参考文档《好好学Linux:Linux中安装使用mkcert签发域名证书》,生成 gitlab.voidking.com 域名的域名证书,并生成一个DHPARAM证书。
6.2. 使用域名证书和DHPARAM证书
1、创建证书目录并且移动证书
1 | mkdir -p /etc/gitlab/ssl/ |
2、修改gitlab url
1 | vim /etc/gitlab/gitlab.rb |
如下修改:
1 | external_url 'https://gitlab.voidking.com' |
3、重新配置gitlab
1 | gitlab-ctl reconfigure |
4、测试访问
服务器上测试,curl localhost -L,正常。
本地浏览器访问 https://gitlab.voidking.com/users/sign_in ,出现安全提示。
这是因为浏览器不信任刚才自建的CA,解决办法是安装rootCA,安装方法参考文档《好好学Linux:Linux中安装使用mkcert签发域名证书》。
安装rootCA后,就没有安全警告了。
7. 错误排查
关闭服务器之后重启,发现无法访问gitlab服务。
1、关闭防火墙
1 | systemctl stop firewalld |
关闭防火墙之后,依然无法访问。
2、查看服务和端口
1 | ps aux | grep nginx |
没有找到nginx服务,说明nginx出了问题。
1 | gitlab-ctl restart nginx |
无效,80端口依然没有监听。
3、查看gitlab日志
1 | gitlab-ctl tail |
这次定位到了问题,缺少pem文件。
1 | 2019-08-06_09:26:08.31983 nginx: [emerg] BIO_new_file("/etc/gitlab/ssl/gitlab.voidking.com+2.pem") failed (SSL: error:02001002:system library:fopen:No such file or directory:fopen('/etc/gitlab/ssl/gitlab.voidking.com+2.pem','r') error:2006D080:BIO routines:BIO_new_file:no such file) |
查看/etc/gitlab/ssl/目录,发现gitlab.voidking.com+2.pem变成了gitlab.voidking.com+3.pem!虽然不知道为什么2变成了3,但是改回来应该就可以了。改回原文件名,问题解决。
8. 后记
至此,局域网的gitlab安装配置完成,可以正常使用了。
在公网环境下,HTTPS的配置更加简单,gitlab.rb 中配置证书颁发机构颁发的SSL证书即可。