1. Harbor简介
Harbor is an open source container image registry that secures images with role-based access control, scans images for vulnerabilities, and signs images as trusted. As a CNCF Incubating project, Harbor delivers compliance, performance, and interoperability to help you consistently and securely manage images across cloud native compute platforms like Kubernetes and Docker.
更多内容参考Harbor官网。
2. Harbor架构
Harbor的目标是帮助用户迅速搭建一个企业级的私有 Docker registry 服务。它以Docker公司开源的registry 为基础,提供了管理UI,基于角色的访问控制(Role Based Access Control),AD/LDAP集成、以及审计日志(Audit logging) 等企业用户需求的功能。
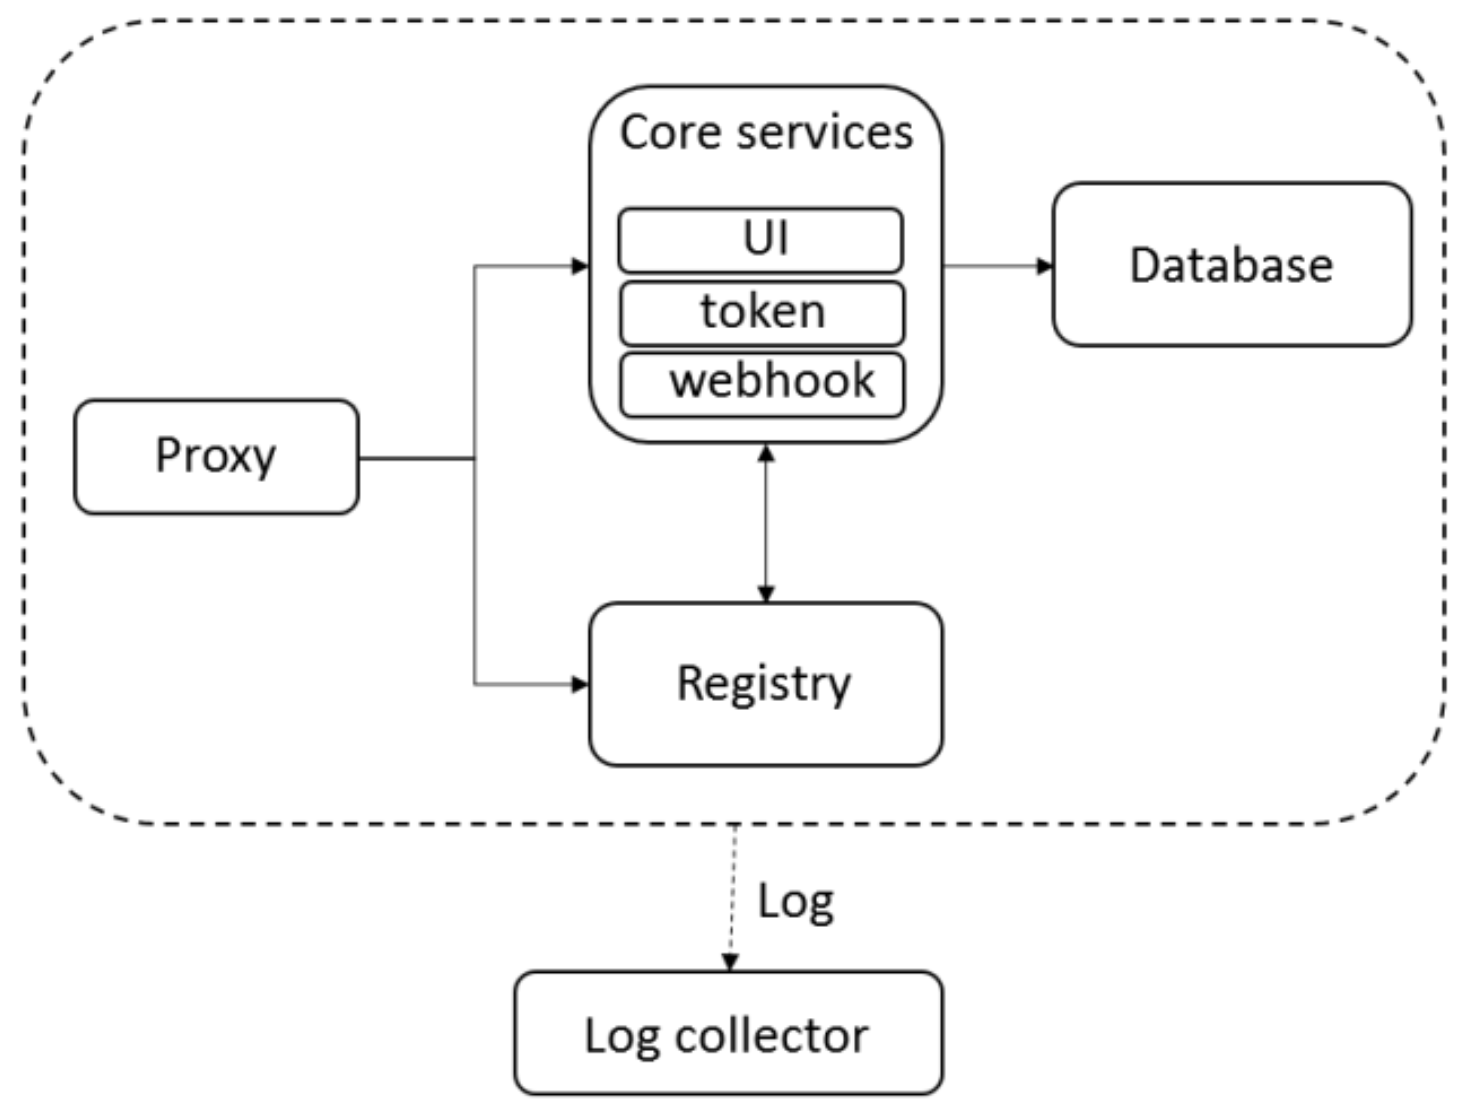
Harbor在架构上主要由五个组件构成:Proxy、Registry、Core services、Database、Log collector
- Proxy:Harbor的registry、UI、token等服务,通过一个前置的反向代理统一接收浏览器、Docker客户端的请求,并将请求转发给后端不同的服务。
- Registry:负责储存Docker镜像,并处理docker push/pull 命令。
- Core services:Harbor的核心功能,主要包括UI、Webhook和Token。UI提供图形化界面;Webhook及时获取registry上image的变化,同步给UI;Token服务根据用户权限给每个docker push/pull命令签发token。
- Database:为core services提供数据库服务,负责储存用户权限、审计日志、Docker image分组信息等数据。
- Log collector:负责收集其他组件的log。
参考文档:
3. 安装Harbor
3.1. 前置条件
参考Harbor Installation Prerequisites
1、硬件需求
硬件最小需求:2C4G40G。
硬件推荐需求:4C8G160G。
2、软件需求
Docker engine,Version 17.06.0-ce+ or higher
Docker Compose,Version 1.18.0 or higher
Openssl,Latest is preferred
3、网络端口
444、4443和80
3.2. 下载安装Harbor
harbor计划安装目录为/opt/harbor,数据目录为/opt/harbor_data
1、访问Harbor releases page,下载需要的harbor版本,这里选择下载 harbor-offline-installer-v1.10.1.tgz
1 | cd ~ |
2、解压
1 | tar -xzvf harbor-offline-installer-v1.10.1.tgz |
3、配置harbor.yml
1 | # The IP address or hostname to access admin UI and registry service. |
配置说明:
- hostname: 指定harbor域名,这个域名的作用有两个:1)这是用来鉴权的域名,我们可以给harbor配置多个域名,但是在鉴权时只会请求这个域名;2)从页面拷贝docker pull命令时会使用这个域名作为前缀。
- https:建议注释掉,不要在这里配置证书,而是配置到nginx层。
- harbor_admin_password:harbor的admin用户密码。
- data_volume:存储镜像数据的路径。
更多配置内容,参考Configure the Harbor YML File
4、执行安装
1 | ./install.sh |

如果安装完成发现配置错误,可以修改配置后再次执行脚本。
如果报错 ERROR: Failed to Setup IP tables: Unable to enable SKIP DNAT rule ,那么重启docker后再次执行脚本。
至此,harbor安装完成,没有配置https。
4. 修改Harbor配置
1、停止
1 | docker-compose down -v |
2、修改配置
修改harbor.yml后,执行
1 | ./prepare |
3、启动
1 | docker-compose up -d |
注意:如果是修改harbor的hostname,harbor重新启动后,数据库内容和镜像内容是依然存在的,可以放心修改。
5. 验证Harbor安装
5.1. 浏览器验证
浏览器访问 http://192.168.56.200 ,可以看到harbor登录页面。
输入用户名密码,admin和Harbor12345,登录harbor控制台。
5.2. 登录验证
1 | docker ps |
输入用户名密码,admin和Harbor12345,登录报错。
5.3. 登录验证报错处理
5.3.1. 报错connection refused
Error response from daemon: Get https://192.168.56.200/v2/: dial tcp 192.168.56.200:443: connect: connection refused
这是因为,docker1.3.x之后与registry交互,默认使用https协议。
1、修改/etc/docker/daemon.json,添加insecure-registries参数
1 | { |
2、重启docker和harbor
1 | systemctl daemon-reload |
5.3.2. 报错Service Unavailable
Error response from daemon: Get “https://192.168.56.200/v2/": Service Unavailable
或者
Error response from daemon: Get “http://192.168.56.200/v2/": received unexpected HTTP status: 503 Service Unavailable
这个错误,大概率是因为docker配置了代理,docker配置代理的方法参考《Linux配置网络代理》。
1、去掉docker代理,或者在代理配置的NO_PROXY变量中加入harbor的IP和域名
1 | vim /etc/systemd/system/docker.service.d/http-proxy.conf |
2、重启docker和harbor
1 | systemctl daemon-reload |
5.3.3. 报错no such host
Error response from daemon: Get “http://192.168.56.200/v2/": Get “http://harbor.voidking.com/service/token?account=admin&client_id=docker&offline_token=true&service=harbor-registry": dial tcp: lookup harbor.voidking.com: no such host
在/etc/hosts中添加解析:
1 | harbor.voidking.com 192.168.56.200 |
重新登录,成功。
6. 使用Harbor
6.1. 启动和停止Harbor
参考文档Reconfigure Harbor and Manage the Harbor Lifecycle
1 | cd /opt/harbor |
6.2. 上传镜像
1 | docker pull busybox:1.31 |
docker push如果报错:
The push refers to repository [harbor.voidking.com/voidking/busybox]
a6d503001157: Preparing
denied: requested access to the resource is denied
这是因为,需要先创建项目。在web控制台创建项目 voidking,再次上传,成功。带有subpath的镜像,同样可以上传成功。
6.3. 下载镜像
1 | docker pull harbor.voidking.com/voidking/busybox:1.31 |
6.4. 查找docker-compose.yml
如果不知道harbor docker-compose.yml的目录,就没有办法对harbor服务进行启停。
查找docker-compose.yml最好使用locate命令,速度快。
1 | locate docker-compose.yml |
6.5. 修改harbor数据库
参考文档:《PostgreSQL入门篇》
7. 错误排查
1 | cd /var/log/harbor/ |
8. 配置Harbor自动启动
当docker发生了重启之后,需要手动执行docker-compose start启动harbor,比较麻烦,因此最好配置上harbor的自动启动。详情参考Docker 笔记 - 将 Harbor 设置为系统服务
1、准备systemd配置文件
1 | vim /etc/systemd/system/harbor.service |
harbor.service内容如下:
1 | [Unit] |
2、设置开机自启动
1 | systemctl daemon-reload |
3、测试重启docker后harbor自启动
1 | systemctl restart docker |
9. 高可用
如果搭建高可用harbor,比如搭建两个实例的harbor,那么需要XSRFKey保持一致,在 common/config/core/app.conf 中配置。
10. Harbor同步配置
参考文档:
可能的问题:harbor配置了复制管理,当出现多个大镜像需要同步时,harbor复制可能会卡死,出现大量pending状态的任务。在页面上手动停止卡死的任务,新的复制同步任务依然会处于pending状态。
解决办法:手动停止任务后,还需要重启一下 harbor jobservice 组件。
1 | docker-compose -f /path/to/harbor/docker-compose.yml restart jobservice |