1. 前言
随着文章越来越多,在网站中寻找文章越来越麻烦。现在有两个方案可供选择:一个是建立搜索系统;另一个是建立分类检索页面。于是,郝同学选择了更简单的后者,本文就记录一下创建categories检索页面的过程。
2. 目标

以郝同学的网站为例,左侧导航栏很小。这就意味着,我们不能像其他其他主题一样,直接把分类显示在导航栏,不然会很丑。
所以,我们需要一个categories页面,在这个页面里进行分类显示。
3. 实践
3.1. 添加categories链接
假设主题是yilia,那么打开yilia/_config.yml文件,找到:
1
2
3
4
5
6
|
menu:
主页: /
归档: /archives
关于: /about
|
修改为:
1
2
3
4
5
6
7
|
menu:
主页: /
分类: /categories
归档: /archives
关于: /about
|
3.2. categories页面
1、新建categories页面
hexo new page categories
该命令在source目录下生成一个categories目录,categories目录下有一个index.md文件。
2、修改categories/index.md为:
1
2
3
4
5
6
| ---
title: 文章分类
date: 2018-06-11 10:13:21
type: "categories"
comments: false
---
|
3、生成html
hexo g,hexo s
4、测试访问
访问 http://localhost:4000/categories/ ,即可看到categories页面,只不过现在的页面只有标题。
参考创建分类页面 和 hexo next 为文章添加分类,发现next主题在生成categories后直接就完成了分类显示。而我们的yilia,明显不行,那就自己动手,风衣足食。
3.3. 修改yilia主题
1、修改categories/index.md为:
1
2
3
4
5
6
7
| ---
title: 文章分类
date: 2018-06-11 10:13:21
type: "categories"
layout: "categories"
comments: false
---
|
指定layout为categories,渲染时就会使用categories.ejs进行渲染。
2、新建yilia/layout/categories.ejs,内容如下:
1
2
3
4
5
6
7
8
9
10
11
12
13
14
15
16
17
18
19
20
21
22
| <article class="article article-type-post show">
<header class="article-header">
<h1 class="article-title" itemprop="name">
<%= page.title %>
</h1>
</header>
<% if (site.categories.length){ %>
<div class="category-all-page article-type-post show">
<h3>共计 <%= site.categories.length %> 个分类</h3>
<ul class="category-list">
<% site.categories.sort('name').each(function(item){ %>
<% if(item.posts.length){ %>
<li class="category-list-item">
<a href="<%- config.root %><%- item.path %>" title="<%= item.name %>"><%= item.name %><sup>[<%= item.posts.length %>]</sup></a>
</li>
<% } %>
<% }); %>
</ul>
</div>
<% } %>
</article>
|
3、新建yilia/source/css/_partial/categories.styl,内容如下:
1
2
3
4
5
6
7
8
9
10
11
12
13
14
15
16
17
18
19
20
21
22
23
24
25
26
27
28
29
30
31
32
33
34
| .category-all-page {
margin: 30px 40px 30px 40px;
position: relative;
min-height: 70vh;
h3{
margin: 20px 0;
}
.category-all-title { text-align: center; }
.category-all { margin-top: 20px; }
.category-list {
margin: 0;
padding: 0;
list-style: none;
}
.category-list-item { margin: 10px 10px; }
.category-list-count {
color: $grey;
&:before {
display: inline;
content: " ("
}
&:after {
display: inline;
content: ") "
}
}
.category-list-child { padding-left: 10px; }
}
|
4、在yilia/source/css/style.styl引入categories.styl:
1
2
3
4
5
6
7
8
9
10
11
12
13
14
| @import "_extend"
@import "_partial/main"
@import "_partial/archive"
@import "_partial/article"
@import "_partial/archive"
@import "_partial/highlight"
@import "_partial/footer"
@import "_partial/share"
@import "_partial/page"
@import "_partial/instagram"
@import "_partial/tagcloud"
@import "_partial/scroll"
@import "_partial/mobile-slider"
@import "_partial/categories"
|
5、测试访问
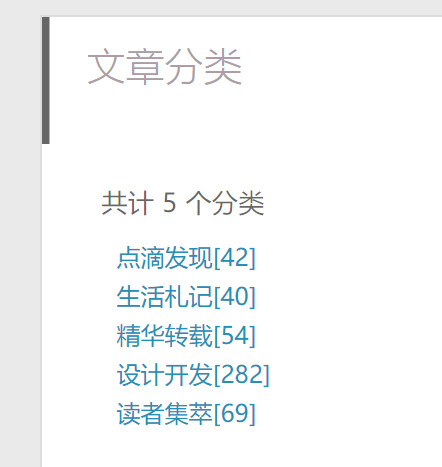
再次访问 http://localhost:4000/categories/ ,发现已经成功显示分类。
3.4. 多层分类
以上,已经完成了categories分类页面,但是只有一层分类。假设,现在有一篇文章的分类为多层分类,例如:
1
2
3
4
5
6
7
8
9
10
11
12
| ---
title: Linux设置邮件提醒
toc: true
date: 2018-05-24 11:00:00
tags:
- linux
- ubuntu
- centos
- mail
categories:
- [专业,测试]
---
|
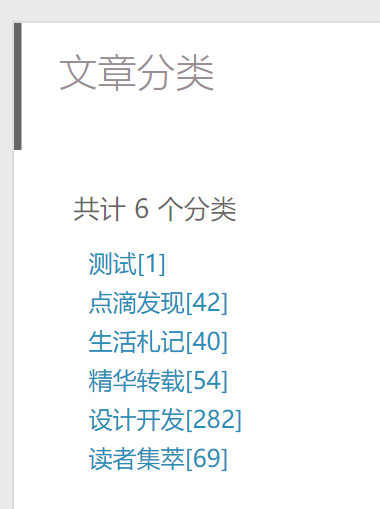
显示的效果为所有类别平级显示,不是我们想要的效果,如下图:
本节就实现多层分类的显示效果,具体操作如下:
1、修改yilia/layout/categories.ejs为:
1
2
3
4
5
6
7
8
9
10
11
12
13
14
15
16
17
18
19
20
| <article class="article article-type-post show">
<header class="article-header" style="border-bottom: 1px solid #ccc">
<h1 class="article-title" itemprop="name">
<%= page.title %>
</h1>
</header>
<% if (site.categories.length){ %>
<div class="category-all-page">
<h2>共计 <%= site.categories.length %> 个分类</h2>
<%- list_categories(site.categories, {
show_count: true,
class: 'category-list-item',
style: 'list',
depth: 2,
separator: ''
}) %>
</div>
<% } %>
</article>
|
2、yilia/source/css/_partial/categories.styl修改为:
1
2
3
4
5
6
7
8
9
10
11
12
13
14
15
16
17
18
19
20
21
22
23
24
25
26
27
28
29
30
31
32
33
34
35
36
37
38
39
40
41
42
43
44
45
46
47
48
49
50
51
| .category-all-page {
margin: 30px 40px 30px 40px;
position: relative;
min-height: 70vh;
h2{
margin: 20px 0;
}
.category-all-title { text-align: center; }
.category-all { margin-top: 20px; }
.category-list {
margin: 0;
padding: 0;
list-style: none;
}
.category-list-item-list-item{
margin: 10px 15px;
}
.category-list-item-list-count{
color: $grey;
&:before {
display: inline;
content: " ("
}
&:after {
display: inline;
content: ") "
}
}
.category-list-item { margin: 10px 10px; }
.category-list-count {
color: $grey;
&:before {
display: inline;
content: " ("
}
&:after {
display: inline;
content: ") "
}
}
.category-list-child { padding-left: 10px; }
}
|
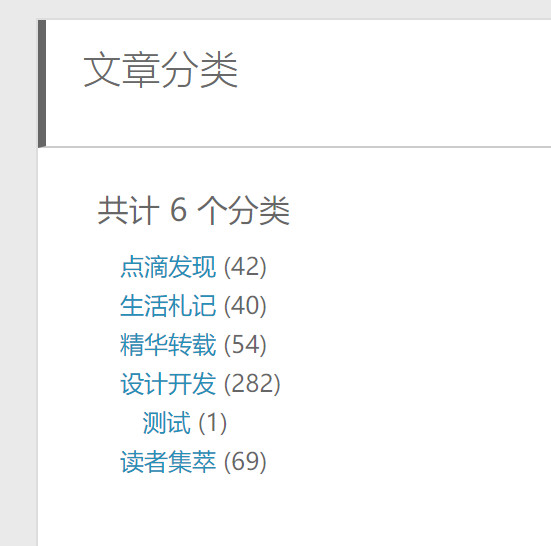
3、再次访问categories,达到了预期效果,如下图:
4. 后记
多看了几眼next主题,比几年前棒多了,现在也是一个很好的选择,适合小白。不过,它的项目结构也变得更加复杂,不方便个性化修改。
5. 书签
Hexo文档
Hexo变量
Hexo之list-categories
hexo-auto-category
Hexo主题实现多级分类显示
Hexo使用攻略:(四)Hexo的分类和标签设置