1. 前言
老板与时俱进,开始带领大家搞机器学习。
新任务:利用深度学习+python+opencv,实现实时视频目标检测。看教程,很简单的样子,搞一下。
参考文档:
- 《深度学习 + OpenCV,Python实现实时视频目标检测》
- Real-time object detection with deep learning and OpenCV
- Faster video file FPS with cv2.VideoCapture and OpenCV
- 用 Python 和 OpenCV 检测和跟踪运动对象
- 用树莓派 + Python + OpenCV 实现家庭监控和移动目标探测(下)
- Python 3.x 安装opencv+opencv_contrib
2. 环境准备
2.1. python
1、参考《Anaconda》,安装Anaconda。
Anaconda常用命令:
- 查看环境,
conda env list - 进入环境,
activate my_env - 退出环境,
deactivate - 查看python版本,
python --version - 添加环境,
conda create -n py3.6 python=3.6 - 删除环境,
conda env remove -n py3.6 - 查看环境中的包,
conda list - 更新当前环境下的所有包,
conda upgrade --all - 安装包,
conda install package_name
2、安装python3.6环境,以便使用对应版本的opencv。
1 | conda create -n py3.6 python=3.6 |
PS:以下命令都是在python3.6环境中执行。
3、安装numpy、imutils
1 | pip install numpy |
2.2. opencv
1、访问Python Extension Packages for Windows,下载python对应版本的opencv。
比如郝同学下载的是opencv_python-3.3.0+contrib-cp36-cp36m-win_amd64.whl,cp36表示Python是3.6版本,win_amd64是表示安装的python是64bit的,+contrib表示包括contrib包。
2、下载好后,把它放到C盘中,执行安装命令:pip install C:\opencv_python-3.3.0+contrib-cp36-cp36m-win_amd64.whl
3. 运行代码
3.1. 修改
Adrian Rosebrock同学的原版代码适用于直接调用摄像头来获取视频流,尴尬的是,小生的电脑摄像头坏了,无法使用。于是,不得不修改代码,主要是把视频流的获取方式改为从本地获取。
1 | # vs = VideoStream(src=0).start() |
1 | # grab the frame from the threaded video stream and resize it |
3.2. 运行
推荐使用命令:
1 | python real_time_object_detection.py -p ./MobileNetSSD_deploy.prototxt.txt -m ./MobileNetSSD_deploy.caffemodel |
或者,指定绝对路径,假设项目目录为C:\Users\voidking\Desktop\real-time-object-detection\,那么命令如下:
1 | python real_time_object_detection.py -p "C:\Users\voidking\Desktop\real-time-object-detection\MobileNetSSD_deploy.prototxt.txt" -m "C:\Users\voidking\Desktop\real-time-object-detection\MobileNetSSD_deploy.caffemodel" |
3.3. 进阶修改
我们看到,prototxt和model都是指定的,那我们的视频文件也用这种方式指定,就更加友好一点。
1 | # construct the argument parse and parse the arguments |
我们插入一行:
1 | ap.add_argument("-v", "--video", required=True, |
然后在初始化视频流时,修改为:
1 | vs =cv2.VideoCapture(args["video"]) |
运行命令修改为:
1 | python real_time_object_detection.py -p ./MobileNetSSD_deploy.prototxt.txt -m ./MobileNetSSD_deploy.caffemodel -v ./test_video.flv |
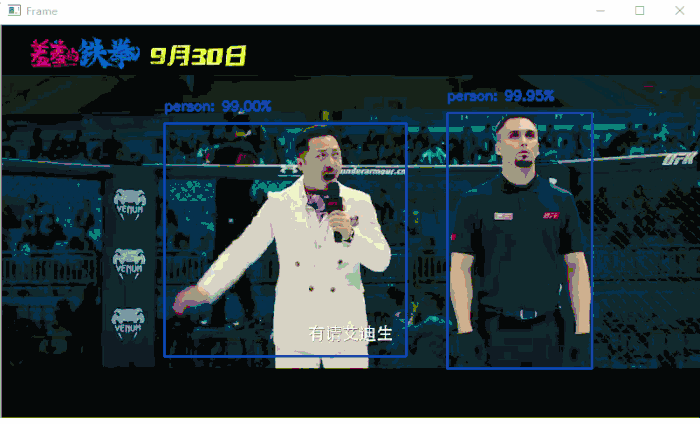
4. 运行效果