1. 前言
《Ubuntu 14.04.5 Server物理机安装》一文中,我们安装了一台Ubuntu Server服务器,整个过程花费了很多时间。令人难过的是,还有15台机器需要安装!本来打算每天安装个一两台,慢慢来,今天老师提醒说为什么不使用脚本呢?对啊,为什么不试试脚本呢!这是一个思路。突然想起师兄曾说,机房的机器系统安装都是通过网络,这也是一个很好的思路啊!
按照上面两个思路,那就研究下批量安装Ubuntu系统的方法!
2. 原理篇
2.1. 历史
参考PXE、kickstart与preseed简介、Linux装机利器Cobbler简述和ubuntu 14.04 无人职守全自动安装-基础知识中,郝同学简单归纳了批量装机的发展。
历史上,很多同学都遇到过和我同样的问题,机器太多,需要挨个装机,简直就是折磨!
于是,为了降低批量装机的难度,出现了PXE技术,它将操作系统远程下载到本地运行,有了这个技术,我们就不需要再挨个机器插U盘安装系统。
有了PXE技术,依然需要在安装的过程中不停地与机器进行交互,设置选项,费时费力。为了减轻同学们的工作量,RedHat推出了kickstart,在安装操作系统前将其中出现的各种问题的应答内容提前写好,使整个操作系统的安装可以自动完成。Debian系的Ubuntu等感觉kickstart对自己不够友善,不能完全满足自己的要求,于是推出了preseed。
再后来,因为kickstart难度系数太高,RedHad又推出了cobbler,把批量装机的难度降低到了小学水平。
2.2. PXE
PXE是Intel公司开发的将操作系统远程下载到本地运行的一种技术。
本地网卡ROM中包含有PXE客户端软件。网卡启动时会发出DHCP请求,从PXE服务器端获得动态IP地址、网关及TFTP服务器信息后,它会自动下载一个用于引导操作系统的启动软件包到本地内存(不同的操作系统使用不同的PXE引导文件)中,再通过此软件加载操作系统启动文件,从而开始操作系统的安装工作。
PXE的详细介绍请参考自动化运维之-PXE实现系统批量自动安装和PXE网络装机攻略。
2.3. kickstart与preseed
在我们手动安装操作系统时,需要回答各种提示问题,而针对某种特定应用时,这种回答完全有章可循,如果我们能在安装操作系统时将其中出现的各种问题的应答内容提前写好,那么整个操作系统的安装就可以自动完成。
kickstart是RedHat公司针对自动安装RedHat、Fedora与CentOS这3种同一体系的操作系统而制定的问答规范。它一般会以.cfg作为文件后缀名,不仅可以自动应答一些简单问题,还可以指定操作系统需要安装的各种软件包,更可以在操作系统完装完成后自动执行一些脚本,这些脚本可以让我们直接配置系统。
通常,kickstart配置文件通过命令行工具system-config-kickstart生成。当然,我们更喜欢在CentOS图形界面环境下生成用于定制操作系统安装的配置文件。
preseed则是Debian/Ubuntu操作系统自动安装的问答规范,同样可以预定义Ubuntu如何安装,其配置更多通过手动处理。
2.4. cobbler
RedHat在2008年发布了网络安装服务器套件 cobbler(补鞋匠),它集成了PXE、DHCP、HTTP、TFTP、kickstart等服务,相对之前的 kickstart ,能够更加快捷、方便的批量布署redhat、centos类系统。
2.5. 选择
由上面的基础概念我们了解到,可选择的技术组合有:
- PXE+DHCP+HTTP+TFTP+kickstart
- PXE+DHCP+HTTP+TFTP+preseed
- PXE+DHCP+HTTP+TFTP+kickstart+preseed
- PXE+cobbler
- PXE+cobbler+preseed
本文,我们选择PXE+DHCP+HTTP+TFTP+kickstart+preseed,主要参考PXE无人值守网络安装Ubuntu14.04 、 PXE+kickstart自动安装ubuntu14.04 和 在 Ubuntu 14.04 中配置 PXE 服务器。
3. 实践篇
3.1. PXE服务器
PXE服务器选择我们手动安装好的那一台,系统是Ubuntu 14.04.5 Server (64-bit)版,当前IP为172.16.0.213。
配置为PXE服务器后网段为10.0.0.0/8,IP为10.0.0.100。
3.2. DHCP
1、安装isc-dhcp-serversudo apt-get update
sudo apt-get install isc-dhcp-server -y
2、查看网卡和ipip add或者ifconfig,查看正在使用的局域网网卡,假设为eth0。
3、指定dhcp网卡sudo vim /etc/default/isc-dhcp-server
拉到最底部,修改为:
1 | INTERFACES="eth0" |
4、配置dhcp服务sudo vim /etc/dhcp/dhcpd.conf
在文件末尾添加:
1 | subnet 10.0.0.0 netmask 255.0.0.0 { |
子网和掩码可以根据自己的需要设置。
filename "pxelinux.0";,指定PXE启动文件名。next-server 10.0.0.100;,指定PXE服务器IP地址,TFTP服务器IP地址。
5、重启服务service isc-dhcp-server restart
备注:也可以安装DNSmasq,DNSmasq实际上是一个集成工具,包含了DNS、DHCP、TFTP服务器。
3.3. TFTP
主要参考Tftpd-hpa
1、安装tftpd-hpaapt-get install tftpd-hpa -y
2、给根目录添加读写权限sudo chmod 777 /var/lib/tftpboot/
3、测试tftp
1 | apt-get install tftp -y |
4、tftpd开启关闭命令sudo /etc/init.d/tftpd-hpa start
sudo /etc/init.d/tftpd-hpa stop
3.4. apache2
1、安装apache2sudo apt-get install apache2 -y
web根目录是 /var/www/html/
2、测试apache2curl 127.0.0.1
3、重启命令sudo /etc/init.d/apache2 restart
3.5. 文件准备
1、上传ubuntu-14.04.5-server-amd64.iso到用户目录。使用xftp上传,或者使用scp命令,这里使用scp命令。打开git bash,执行:scp ubuntu-14.04.5-server-amd64.iso test@172.16.0.213:~
2、挂载ubuntu-14.04.5-server-amd64.iso到ubuntu目录。在用户目录执行:sudo mkdir /var/www/html/ubuntu
sudo mount ubuntu-14.04.5-server-amd64.iso /var/www/html/ubuntu
3、拷贝部分文件到tftpsudo cp -r /var/www/html/ubuntu/install/netboot/* /var/lib/tftpboot/
4、拷贝seed文件到web根目录sudo cp /var/www/html/ubuntu/preseed/ubuntu-server.seed /var/www/html/
5、编辑seed文件sudo vim /var/www/html/ubuntu-server.seed
在文件末尾添加:
1 | d-i live-installer/net-image string http://10.0.0.100/ubuntu/install/filesystem.squashfs |
(1)因为在ubuntu12.10版本以后,安装一些包会依赖于预配置的文件系统,这就是导致使用kickstart方式无法成功安装的原因。
(2)自动安装ssh服务。
3.6. kickstart
ks.cfg中保存的是安装系统过程中默认的系统配置,没有这个文件就需要安装中对系统手动交互设置。kickstart则是方便编辑这个文件的,不用它的话也可以手工编辑。
kickstart需要GUI界面,我因为是安装的server,所以需要安装桌面(如果是desktop版本就不需要)。
1、安装图形界面sudo apt-get install ubuntu-desktop -y
过程非常久,请先去继续读论文。
2、安装kickstartsudo apt-get install system-config-kickstart -y
3、使用屏幕键盘连接主机,进入图形界面sudo startx,或者直接重启sudo reboot
4、点击右上角“Search your computer and online resources”,搜索kickstart,启动kickstart。
5、然后,按照图示选择kickstart的配置。
附:上图的长图合成工具为 美图秀秀网页版
6、保存ks.cfg后,查看ks.cfg内容为:
1 | #Generated by Kickstart Configurator |
7、移动ks.cfg到web根目录sudo mv ks.cfg /var/www/html/
8、修改txt.cfgsudo vim /var/lib/tftpboot/ubuntu-installer/amd64/boot-screens/txt.cfg,原txt.cfg为:
1 | default install |
修改为:
1 | default install |
3.7. pxelinux.cfg
编辑pxelinux.cfg配置文件sudo vim /var/lib/tftpboot/pxelinux.cfg/default
1 | # D-I config version 2.0 |
timeout默认是0,改为60(6秒后自动选择install选项)。
3.8. 收尾
1、重新配置IPsudo vim /etc/network/interfaces,修改eth0的IP为10.0.0.100:
1 | # This file describes the network interfaces available on your system |
2、重启eth0sudo ifdown eth0,sudo ifup eth0
3、重启dhcpsudo service isc-dhcp-server restart
4、重新挂载镜像sudo mount ubuntu-14.04.5-server-amd64.iso /var/www/html/ubuntu
5、检查各个服务ps aux | grep dhcp
ps aux | grep apache
ps aux | grep tftp
6、把PC和PXE服务器连接到同一个交换机,测试一下PC能否获取到IP。
7、PC浏览器访问 http://10.0.0.100/ubuntu/ ,测试能否正常访问Web服务。
4. 安装篇
4.1. 安装步骤
1、把PXE服务器和需要安装系统的主机(下文统一称为目标主机)连接到同一个交换机。
2、目标主机开机启动进入BIOS,首选启动项选择PXE,保存退出。
3、然后,目标主机就会自动获取IP地址,连接PXE服务器,进入到安装界面。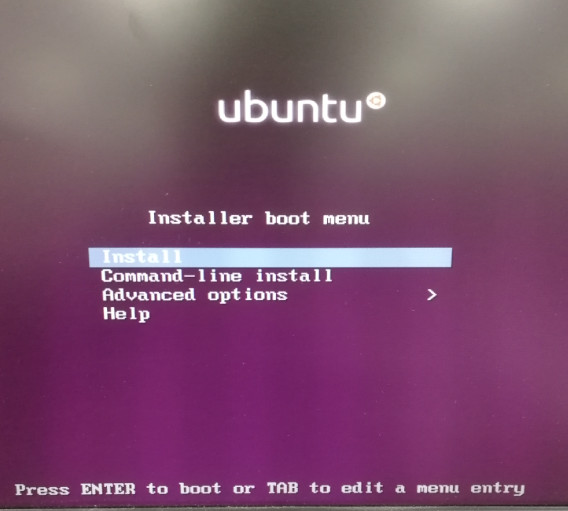
4、在自动网络配置的时候失败,报错“Network autoconfiguration failed”,多次尝试依然失败。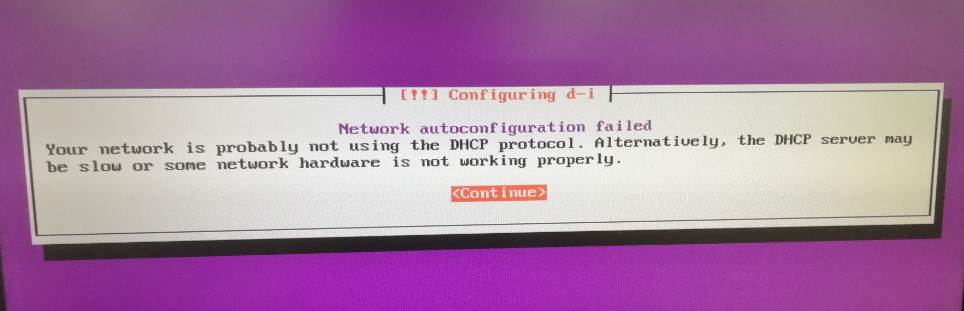
Alt+F2,进入命令行界面,ip add,查看到已经获取到IP地址。
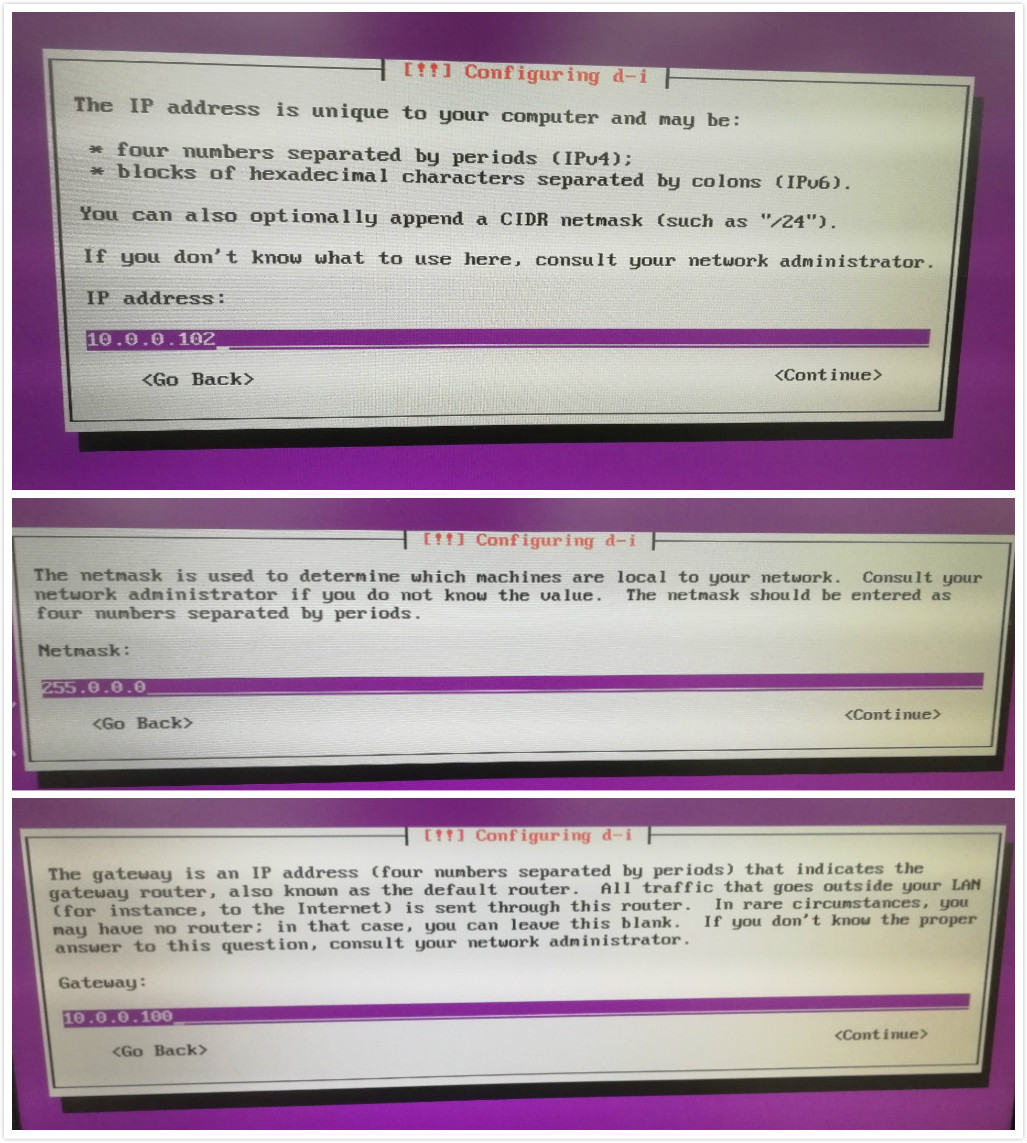
Alt+F1,切换回安装界面,这时需要手动配置,一次不行就再来一次。
5、安装过程中,分区后卡住,需要手动选择确认分区。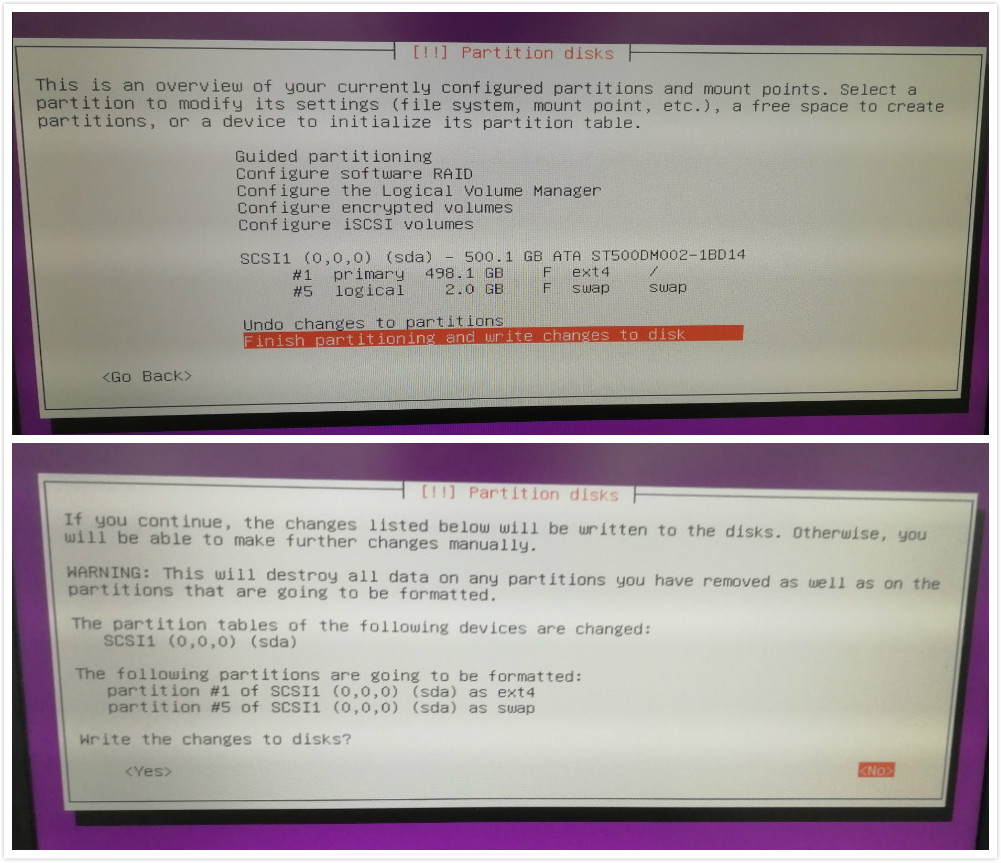
6、之后,无需任何操作,直到安装成功。
7、测试ssh服务ssh test@localhost,顺利登录。
以上安装过程,已经省去了很多交互步骤,但是依然比较麻烦,主要存在两个问题:一个是自动配置网络的问题,一个是需要分区确认的问题。下面尝试解决这两个问题。
4.2. 网络问题
1、对于网络配置问题,在14.04 server PXE installation fails at “Configure the network” page 找到了可能的答案,也许是/var/lib/tftpboot/pxelinux.cfg/default 文件的问题,修改为:
1 | # D-I config version 2.0 |
问题依旧。最好再改回原来的/var/lib/tftpboot/pxelinux.cfg/default文件配置,因为这样启动时通过DHCP获取IP的时间明显变长了,有时还会出现无法获取IP以至于无法启动安装的情况。如果没有获取到IP,记得及时按下ctrl+alt+del,进行重启,不然要等很久才能开始第二次尝试。
2、莫非是dhcp配置的问题?参考14.04 server PXE installation fails at “Configure the network” page修改网卡配置为:
1 | # This file describes the network interfaces available on your system |
重启网络,sudo ifdown eth0,sudo ifup eth0。
重启dhcp,sudo service isc-dhcp-server restart。
问题依旧。
3、参考Install And Configure PXE Server On Ubuntu 14.04 LTS,sudo vim /etc/dhcp/dhcpd.conf,在最后添加:
1 | allow booting; |
重启dhcp,sudo service isc-dhcp-server restart。
问题依旧。
4、莫非是因为没有安装DNS?参考《Ubuntu14.04配置DNS Server》,安装好DNS。
问题依旧。
5、参考preseeds,sudo vim /var/www/html/ubuntu-server.seed,在尾部添加:
1 | d-i netcfg/choose_interface select auto |
问题依旧。
6、删除步骤第5次尝试的内容,参考,sudo vim /var/www/html/ubuntu-server.seed,在尾部添加:
1 | d-i netcfg/choose_interface select eth0 |
问题依旧。
7、删除步骤第6次尝试的内容,参考基于PXE和preseed安装Ubuntu-14.04 Server 64位操作系统,sudo vim /var/www/html/ubuntu-server.seed,在尾部添加:
1 | d-i netcfg/choose_interface select eth0 |
问题依旧。
8、参考附录 B. 使用预置自动进行安装,sudo vim /var/www/html/ubuntu-server.seed,在尾部添加:
1 | # If you prefer to configure the network manually, uncomment this line and |
问题依旧。感觉netcfg这个系列的命令根本没有生效!
附录 B. 使用预置自动进行安装一文中说,例如,为网卡设置静态地址。它使加载了预置文件以后网络预置再运行一次,这需要将下面的命令包含在 “preseed/run” 脚本里面:kill-all-dhcp; netcfg
于是在Is it possible to download a bash script and execute it from a preseed file?和kill-all-dhcp中找到了使用脚本的方法。
(1)创建脚本sudo vim /var/www/html/run.sh
写入内容为:
1 |
|
(2)变更权限sudo chmod a+x /var/www/html/run.sh
(3)在ubuntu-server.seed文件中添加一行:
1 | d-i preseed/run string run.sh |
问题依旧,但是Alt+F2进入命令行,发现获取的IP确实没有了。
9、莫非,是因为DHCP的网段问题?折腾了一个多小时,PXE服务器地址换成192.168.34.1,DHCP换成了192.168.34.0网段,然而并没有什么用。
最终,我猜测这个锅是ubuntu14的,或者是电脑硬件的。在askubuntu上进行了提问,但是没有得到满意的回复。
4.3. 分区问题
1、参考Ubuntu Kickstart installation using LVM waits for input,修改ks.cfg文件。
sudo vim /var/www/html/ks.cfg,添加:
1 | preseed partman-lvm/confirm_nooverwrite boolean true |
问题依旧。
2、sudo vim /var/www/html/ks.cfg,添加:
1 | preseed partman-lvm/confirm_nooverwrite boolean true |
问题依旧。
3、删除ks.cfg中添加的内容,参考Automated Kickstart Partitioning,sudo vim /var/www/html/ubuntu-server.seed,在末尾加上:
1 | d-i partman/confirm_write_new_label boolean true |
分区成功,吼吼吼!折腾了一整天,总算有点成就,泪流满面。。。让我安静的哭一会。。。
5. 后记
配置Ubuntu批量自动安装的过程中,发现最重要的两个文件是/var/www/html/ks.cfg 和 /var/www/html/ubuntu-server.seed,因为他们两个是控制交互的。
折腾的过程中学到了很多东西,而最终的成果,除了网络需要手动配置之外,其他都很满意。我会继续尝试解决网络配置的问题,有了进展,再更新本文。