一个计算机技术爱好者与学习者

0%

好好学OpenStack:Ubuntu16手动安装OpenStack——neutron篇

1. 目标

紧接着《Ubuntu16手动安装OpenStack——nova篇》,本文我们来安装neutron,主要参考Networking serviceInstall and configure for UbuntuOpenStack Queens : Configure Neutron

2. neutron简介

OpenStack Networking(neutron)允许用户创建和连接接口设备,这些设备由其他OpenStack服务管理并连入网络。可以实现插件以适应不同的网络设备和软件,为OpenStack架构和部署提供灵活性。

它包括以下组件:
neutron-server
接受API请求,并将请求通过路由找到适当的OpenStack Networking插件以进行操作。

OpenStack Networking plug-ins and agents
插拔端口,创建网络或子网,并提供IP寻址。这些插件和代理程序因特定云中使用的供应商和技术而异。OpenStack Networking附带了很多插件和代理,可以用于思科虚拟和物理交换机,NEC OpenFlow产品,Open vSwitch,Linux桥接和VMware NSX产品。

公共代理是L3(第3层),DHCP(动态主机IP寻址)和插件代理。

Messaging queue
大多数OpenStack Networking安装使用messaging queue,在neutron-server和各种代理之间传递信息。还用于存储特定插件的网络状态,算是一个数据库。

OpenStack Networking主要与OpenStack Compute交互,为其实例提供网络和连接。

更多信息请参考Networking (neutron) concepts

3. 主机网络

在每个节点上安装操作系统后,必须配置网络接口。官方建议禁用任何自动网络管理工具,并手动编辑配置文件。有关如何配置网络的详细信息,请参阅文档

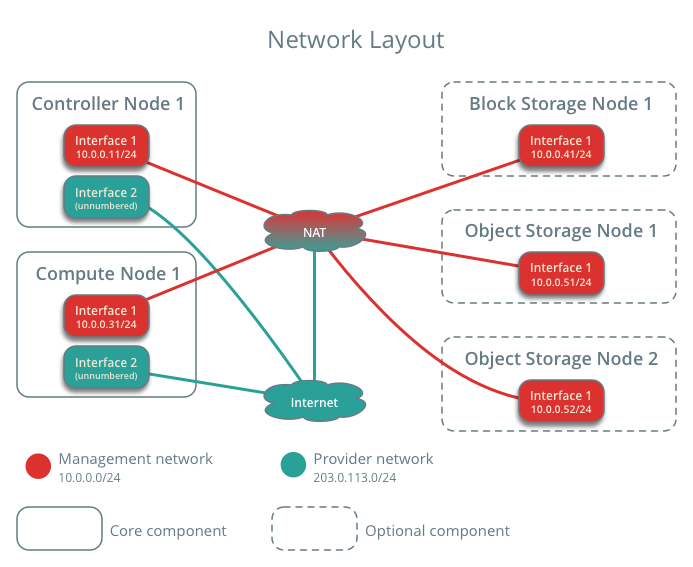
出于管理目的,所有节点都需要Internet访问,例如程序包安装,安全更新,域名系统(DNS)和网络时间协议(NTP)。在大多数情况下,节点应通过管理网络接口获得Internet访问。为了突出网络分离的重要性,示例体系结构使用专用地址空间用于管理网络,并假设物理网络基础结构通过网络地址转换(NAT)或其他方法提供Internet访问。

在provider网络架构中,所有实例都直接连接到provider网络。在私网体系结构中,实例可以连接到一个私网或多个私网。私网可以完全属于OpenStack,不接入外网;也可以通过provider网络接入外部网络。
4. 控制节点

4.1. root用户

为了避免权限问题,建议切换到root用户进行操作(否则要加很多sudo)。
sudo -i

4.2. 数据库

1、登录数据库
mysql -uroot -p,密码为openstack。

2、创建neutron数据库
CREATE DATABASE neutron;

3、授权

1
2
3
GRANT ALL PRIVILEGES ON neutron.* TO 'neutron'@'localhost' IDENTIFIED BY 'openstack';

GRANT ALL PRIVILEGES ON neutron.* TO 'neutron'@'%' IDENTIFIED BY 'openstack';

4、退出数据库
exit;

4.3. 证书和端点

1、使admin环境生效
. admin-openrc

2、创建neutron用户
openstack user create --domain default --password-prompt neutron

根据提示设置密码为openstack。

3、添加admin角色给neutron用户
openstack role add --project service --user neutron admin

4、创建neutron服务实体
openstack service create --name neutron --description "OpenStack Networking" network

5、创建网络服务端点

1
2
3
4
5
openstack endpoint create --region RegionOne network public http://controller:9696

openstack endpoint create --region RegionOne network internal http://controller:9696

openstack endpoint create --region RegionOne network admin http://controller:9696

4.4. 安装配置

1、安装相关组件

1
apt-get -y install neutron-server neutron-plugin-ml2 neutron-plugin-linuxbridge-agent neutron-l3-agent neutron-dhcp-agent neutron-metadata-agent python-neutronclient

2、备份neutron.conf
mv /etc/neutron/neutron.conf /etc/neutron/neutron.conf.bak

3、vim /etc/neutron/neutron.conf,新建neutron.conf内容为:

1
2
3
4
5
6
7
8
9
10
11
12
13
14
15
16
17
18
19
20
21
22
23
24
25
26
27
28
29
30
31
32
33
34
35
36
37
38
39
40
41
42
43
44
[DEFAULT]
core_plugin = ml2
service_plugins = router
auth_strategy = keystone
state_path = /var/lib/neutron
dhcp_agent_notification = True
allow_overlapping_ips = True
notify_nova_on_port_status_changes = True
notify_nova_on_port_data_changes = True
# RabbitMQ connection info
transport_url = rabbit://openstack:openstack@controller

[agent]
root_helper = sudo /usr/bin/neutron-rootwrap /etc/neutron/rootwrap.conf

# Keystone auth info
[keystone_authtoken]
www_authenticate_uri = http://controller:5000
auth_url = http://controller:5000
memcached_servers = controller:11211
auth_type = password
project_domain_name = default
user_domain_name = default
project_name = service
username = neutron
password = openstack

# MariaDB connection info
[database]
connection = mysql+pymysql://neutron:openstack@controller/neutron

# Nova connection info
[nova]
auth_url = http://controller:5000
auth_type = password
project_domain_name = default
user_domain_name = default
region_name = RegionOne
project_name = service
username = nova
password = openstack

[oslo_concurrency]
lock_path = $state_path/tmp

4、更改权限
chmod 640 /etc/neutron/neutron.conf

chgrp neutron /etc/neutron/neutron.conf

5、vi /etc/neutron/l3_agent.ini,如下修改:

1
2
# line 17: add
interface_driver = neutron.agent.linux.interface.BridgeInterfaceDriver

6、vi /etc/neutron/dhcp_agent.ini,如下修改:

1
2
3
4
5
6
# line 17: add
interface_driver = neutron.agent.linux.interface.BridgeInterfaceDriver
# line 28: uncomment
dhcp_driver = neutron.agent.linux.dhcp.Dnsmasq
# line 37: uncomment and change
enable_isolated_metadata = true

7、vi /etc/neutron/metadata_agent.ini,如下修改:

1
2
3
4
5
6
# line 22: uncomment and specify Nova API server
nova_metadata_host = controller
# line 34: uncomment and specify any secret key you like
metadata_proxy_shared_secret = openstack
# line 260: uncomment and specify Memcache Server
memcache_servers = controller:11211

8、vi /etc/neutron/plugins/ml2/ml2_conf.ini,如下修改:

1
2
3
4
5
6
7
8
9
10
11
# line 129: add ( it's OK with no value for "tenant_network_types" (set later if need) )
[ml2]
type_drivers = flat,vlan,vxlan
tenant_network_types =
mechanism_drivers = linuxbridge,l2population
extension_drivers = port_security
# line 262: uncomment and add
enable_security_group = True
firewall_driver = neutron.agent.linux.iptables_firewall.IptablesFirewallDriver
# end line: uncomment
enable_ipset = True

9、vi /etc/neutron/plugins/ml2/linuxbridge_agent.ini,如下修改:

1
2
# line 235: add own IP address
local_ip = 192.168.56.110

10、vi /etc/nova/nova.conf,如下修改:

1
2
3
4
5
6
7
8
9
10
11
12
13
14
15
16
17
18
19
20
# add follows into [DEFAULT] section
use_neutron = True
linuxnet_interface_driver = nova.network.linux_net.LinuxBridgeInterfaceDriver
firewall_driver = nova.virt.firewall.NoopFirewallDriver
vif_plugging_is_fatal = True
vif_plugging_timeout = 300

# add follows to the end : Neutron auth info
# the value of metadata_proxy_shared_secret is the same with the one in metadata_agent.ini
[neutron]
auth_url = http://controller:5000
auth_type = password
project_domain_name = default
user_domain_name = default
region_name = RegionOne
project_name = service
username = neutron
password = openstack
service_metadata_proxy = True
metadata_proxy_shared_secret = openstack

4.5. 完成安装

1、创建链接
ln -s /etc/neutron/plugins/ml2/ml2_conf.ini /etc/neutron/plugin.ini

2、生成数据库表结构
su -s /bin/bash neutron -c "neutron-db-manage --config-file /etc/neutron/neutron.conf --config-file /etc/neutron/plugin.ini upgrade head"

3、重启网络服务并设置开机启动

1
2
3
4
for service in server l3-agent dhcp-agent metadata-agent linuxbridge-agent; do
systemctl restart neutron-$service
systemctl enable neutron-$service
done

4、重启nova
systemctl restart nova-api nova-compute

5、查看网络agent
openstack network agent list

如上图,看到4个agent,都在controller节点上。

5. 计算节点

主要参考OpenStack Queens : Configure Neutron

5.1. root用户

为了避免权限问题,建议切换到root用户进行操作(否则要加很多sudo)。
sudo -i

5.2. 安装配置

1、安装组件
apt-get -y install neutron-common neutron-plugin-ml2 neutron-plugin-linuxbridge-agent

2、备份neutron.conf
mv /etc/neutron/neutron.conf /etc/neutron/neutron.conf.bak

3、vim /etc/neutron/neutron.conf,新建neutron.conf如下:

1
2
3
4
5
6
7
8
9
10
11
12
13
14
15
16
17
18
19
20
21
22
23
24
25
26
[DEFAULT]
core_plugin = ml2
service_plugins = router
auth_strategy = keystone
state_path = /var/lib/neutron
allow_overlapping_ips = True
# RabbitMQ connection info
transport_url = rabbit://openstack:openstack@controller

[agent]
root_helper = sudo /usr/bin/neutron-rootwrap /etc/neutron/rootwrap.conf

# Keystone auth info
[keystone_authtoken]
www_authenticate_uri = http://controller:5000
auth_url = http://controller:5000
memcached_servers = controller:11211
auth_type = password
project_domain_name = default
user_domain_name = default
project_name = service
username = neutron
password = openstack

[oslo_concurrency]
lock_path = $state_path/lock

4、修改权限
chmod 640 /etc/neutron/neutron.conf

chgrp neutron /etc/neutron/neutron.conf

5、vi /etc/neutron/plugins/ml2/ml2_conf.ini,如下修改:

1
2
3
4
5
6
7
8
9
10
11
# line 129: add ( it's OK with no value for "tenant_network_types" (set later if need) )
[ml2]
type_drivers = flat,vlan,vxlan
tenant_network_types =
mechanism_drivers = linuxbridge,l2population
extension_drivers = port_security
# line 262: uncomment and add
enable_security_group = True
firewall_driver = neutron.agent.linux.iptables_firewall.IptablesFirewallDriver
# end line: uncomment
enable_ipset = True

6、vi /etc/neutron/plugins/ml2/linuxbridge_agent.ini,如下修改:

1
2
# line 235: add own Ip address
local_ip = 192.168.56.111

7、vi /etc/nova/nova.conf,如下修改:

1
2
3
4
5
6
7
8
9
10
11
12
13
14
15
16
17
18
19
# add follows into [DEFAULT] section
use_neutron = True
linuxnet_interface_driver = nova.network.linux_net.LinuxBridgeInterfaceDriver
firewall_driver = nova.virt.firewall.NoopFirewallDriver
vif_plugging_is_fatal = True
vif_plugging_timeout = 300
# add follows to the end: Neutron auth info
# the value of metadata_proxy_shared_secret is the same with the one in metadata_agent.ini
[neutron]
auth_url = http://controller:5000
auth_type = password
project_domain_name = default
user_domain_name = default
region_name = RegionOne
project_name = service
username = neutron
password = openstack
service_metadata_proxy = True
metadata_proxy_shared_secret = openstack

8、创建链接
ln -s /etc/neutron/plugins/ml2/ml2_conf.ini /etc/neutron/plugin.ini

9、重启网络服务
systemctl restart nova-compute neutron-linuxbridge-agent

10、设置开启自启动
systemctl enable neutron-linuxbridge-agent

6. 验证操作

在控制节点执行以下命令。

1、使admin环境生效
. admin-openrc

2、查看agents
openstack network agent list

如上图,此时就能看到5个agent,其中4个在controller节点,1个在compute节点。