1. 目标本文,目标是使用ansible安装lnmp+haproxy。
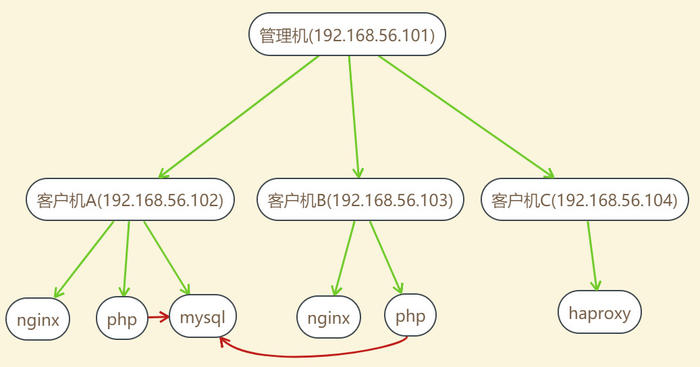
2. 设计项目结构参考最佳实践-Content Organization ,如下图:
注意点:
角色分配简单明确。 在hosts中分组添加变量,指定安装软件。 二次执行脚本时不能影响已经安装的服务。 3. 安装流程1、添加密钥
4. 实践4.1. 文件准备1、创建项目lnmpmkdir lnmp && cd lnmp
2、创建角色目录mkdir rolesmkdir -p roles/{1_key,2_sudo,3_sources,4_chrony,5_software,6_check}/{tasks,handlers,vars,files,templates}
3、创建变量目录mkdir group_vars host_vars
4、创建hosts文件,分配安装组,内容如下:
1
2
3
4
5
6
7
8
9
10
11
12
13
14
15
16
17
18
19
20
21
22
23
24
25
26
27
28
29
30
31
32
33
34
35
36
37
[base] 192.168.56.102 192.168.56.103 192.168.56.104 [nginx_php_mysql] 192.168.56.102 [nginx_php] 192.168.56.103 [haproxy] 192.168.56.104 [base:vars] install_nginx =false install_php =false install_mysql =false install_haproxy =false [nginx_php_mysql:vars] install_nginx =true install_php =true install_mysql =true install_haproxy =false [nginx_php:vars] install_nginx =true install_php =true install_mysql =false install_haproxy =false [haproxy:vars] install_nginx =false install_php =false install_mysql =false install_haproxy =true
5、创建site.yml文件,内容为:
1
2
3
4
5
6
7
8
9
10
--- - hosts: all gather_facts: false roles: - 1_key - 2_sudo - 3_sources - 4_chrony - 5_software - 6_check
6、关闭第一次使用ansible连接客户端时命令提示sudo vim /etc/ansible/ansible.cfg,如下修改
1 2 host_key_checking = False
4.2. 添加密钥1、设置用户和密码vim group_vars/base.yml,内容为:
1
2
3
4
5
--- ansible_ssh_user: voidking ansible_ssh_pass: voidking ansible_sudo: voidking ansible_sudo_pass: voidking
2、vim test.yml,内容为:
1
2
3
4
5
6
--- - hosts: all vars_files: - group_vars/base.yml roles: - 1_key
3、vim roles/1_key/tasks/main.yml,内容为:
1
2
3
4
5
6
7
8
9
10
11
--- - name: copy public key copy: src: /home/voidking/.ssh/id_rsa.pub dest: /home/voidking/.ssh/id_rsa.pub.tmp owner: voidking group: voidking mode: 0600 force: yes - name: add public key shell: cd /home/voidking/.ssh && cat id_rsa.pub.tmp | tee >> authorized_keys
4、vim test_hosts,内容为:
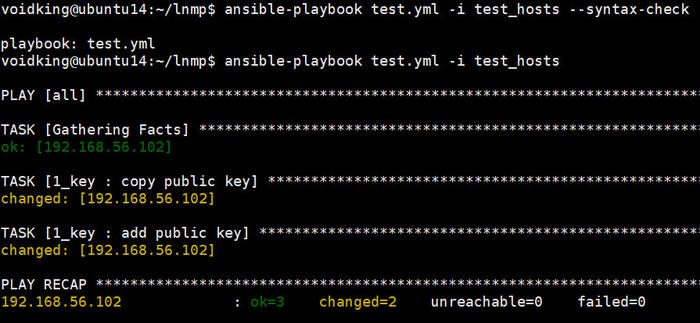
5、执行脚本
1 2 ansible-playbook test.yml -i test_hosts --syntax-check ansible-playbook test.yml -i test_hosts
5、在客户端查看结果ll .ssh
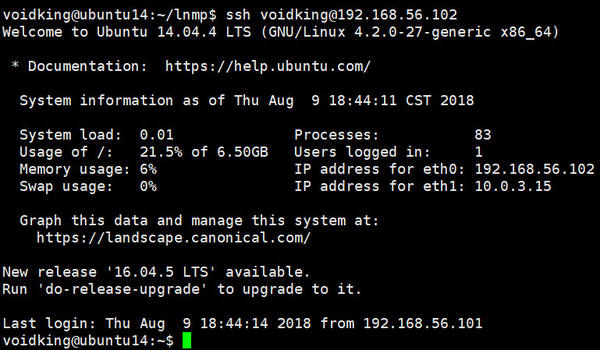
6、测试登录ssh voidking@192.168.56.102
4.3. sudo免密1、vim test.yml,内容为:
1 2 3 4 5 6 7 --- - hosts: all vars_files: - group_vars/base.yml roles: - 2_sudo
2、vim roles/2_sudo/tasks/main.yml,内容为:
1 2 3 4 --- - name: add sudo user shell: 'sudo sh -c "echo voidking ALL = NOPASSWD: ALL >> /etc/sudoers"'
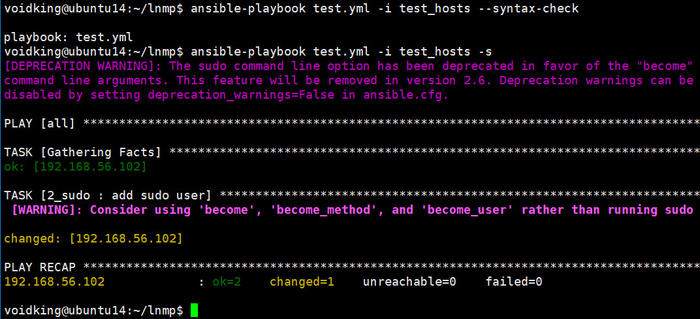
3、执行脚本
1 2 ansible-playbook test.yml -i test_hosts --syntax-check ansible-playbook test.yml -i test_hosts -s
4、在客户端查看结果sudo ls
4.4. sudo免密2上面的方法,虽然成功添加了sudo,但是从提示我们看出,在shell模块中sudo马上就不能使用了。
1、vim roles/2_sudo/tasks/main.yml,修改如下:
1 2 3 4 5 --- - name: add sudo user become_user: root become: true shell: "echo voidking ALL = NOPASSWD: ALL >> /etc/sudoers"
2、执行脚本
1 2 ansible-playbook test.yml -i test_hosts --syntax-check ansible-playbook test.yml -i test_hosts
4.5. 更新安装源1、vim test.yml,内容为:
1 2 3 4 5 6 7 8 --- - hosts: all vars_files: - group_vars/base.yml roles: - 3_sources
2、vim roles/3_sources/files/sources.list,内容为:
1 2 3 4 5 6 7 8 9 10 11 12 13 14 15 16 deb http: deb http: deb http: deb http: ##測試版源 deb http: # 源碼 deb-src http: deb-src http: deb-src http: deb-src http: ##測試版源 deb-src http: # Canonical 合作夥伴和附加 # deb http: # deb http:
3、vim roles/3_sources/tasks/main.yml,内容为:
1 2 3 4 5 6 7 8 9 10 11 12 13 14 15 --- - name: replace sources.list copy: src: ../files/sources.list dest: /etc/apt/sources.list force: yes - name: update become_user: root become: true shell: apt update - name: upgrade become_user: root become: true apt: upgrade: yes
4、执行脚本
1 2 ansible-playbook test.yml -i test_hosts --syntax-check ansible-playbook test.yml -i test_hosts
4.6. 时间同步4.6.1. 管理机准备1、管理机安装chronyapt -y install chrony
2、重启chronyservice chrony restart
3、拷贝chrony.confcp /etc/chrony/chrony.conf roles/4_chrony/files/
4、vim roles/4_chrony/files/chrony.conf,如下修改:
1 2 3 4 5 6 7 # line 20 ,comment #server 0.debian.pool.ntp.org offline minpoll 8 #server 1.debian.pool.ntp.org offline minpoll 8 #server 2.debian.pool.ntp.org offline minpoll 8 #server 3.debian.pool.ntp.org offline minpoll 8 # line 24 ,add server 192.168 .56 .101 iburst
4.6.2. playbook配置1、vim test.yml,内容为:
1 2 3 4 5 6 7 8 9 --- - hosts: all vars_files: - group_vars/base.yml roles: - 4_chrony
2、vim group_vars/base.yml,内容为:
1
2
3
4
5
6
7
8
--- ansible_ssh_user: voidking ansible_ssh_pass: voidking ansible_sudo: voidking ansible_sudo_pass: voidking ansible_become_user: root ansible_become_pass: voidking ansible_become: true
3、vim roles/4_chrony/tasks/main.yml,内容为:
1 2 3 4 5 6 7 8 9 10 11 12 13 14 15 16 17 --- - name: install chrony apt: name: chrony state: latest - name: change config copy: src: ../files/chrony.conf dest: /etc/chrony/chrony.conf owner: root group: root mode: 0644 force: yes - name: restart chrony service: name: chrony state: restarted
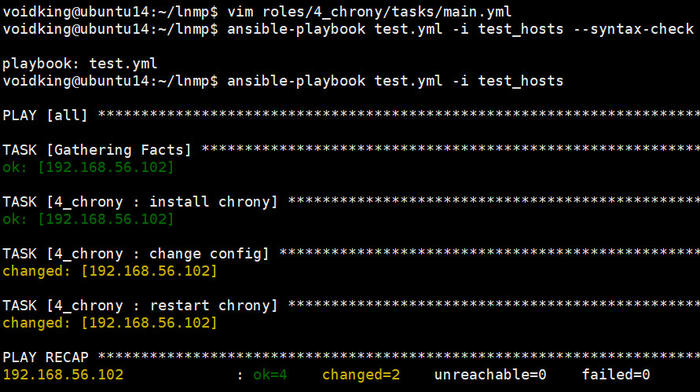
4、执行脚本
1 2 ansible-playbook test.yml -i test_hosts --syntax-check ansible-playbook test.yml -i test_hosts
5、在客户机验证chronychronyc sources
4.7. 安装核心软件1、vim test_hosts,内容为:
1 2 3 4 5 6 7 8 [test] 192.168.56.102 [test:vars] install_nginx =true install_php =true install_mysql =true install_haproxy =true
2、vim test.yml,内容为:
1 2 3 4 5 6 7 8 9 10 --- - hosts: all vars_files: - group_vars/base.yml roles: - 5_software
3、vim roles/5_software/tasks/main.yml,内容为:
1 2 3 4 5 6 7 8 9 10 11 12 13 14 15 16 17 18 19 20 21 22 23 24 25 26 27 28 29 30 31 32 33 34 35 36 37 38 39 40 41 42 43 44 45 46 47 48 49 50 51 52 53 54 55 56 57 58 59 60 61 62 63 64 65 66 67 68 69 70 71 72 73 74 75 76 --- - name: install nginx apt: name: nginx state: latest when: install_nginx - name: install php apt: name: "{{item}} " state: latest update_cache: yes with_items: - php5 - libapache2-mod-php5 - php5-mcrypt - php5-curl - php5-imagick - php5-cli - php5-json - php5-fpm - php5-mysql when: install_php - name: install mysql apt: name: "{{item}} " state: latest with_items: - mysql-common - mysql-server - mysql-client - python-mysqldb when: install_mysql - name: config mysql passwd mysql_user: login_user: root login_password: "\n" name: root password: "voidking" host: "{{item}} " priv: '*.*:ALL,GRANT' state: present check_implicit_admin: yes with_items: - "localhost" - "%" when: install_mysql - name: comment bind-address shell: sed -i 's/^bind-address/#bind-address/g' /etc/mysql/my.cnf when: install_mysql - name: restart mysql service service: name: mysql state: restarted enabled: true when: install_mysql - name: install haproxy apt: name: haproxy state: latest environment: RUNLEVEL: 1 when: install_haproxy - name: config haproxy shell: sed -i 's/ENABLED=0/ENABLED=1/g' /etc/default/haproxy when: install_haproxy - name: config haproxy port copy: src: ../files/haproxy.cfg dest: /etc/haproxy/haproxy.cfg force: yes when: install_haproxy - name: restart haproxy service: name: haproxy state: restarted when: install_haproxy
4、vim roles/5_software/files/haproxy.cfg,内容为
1 2 3 4 5 6 7 8 9 10 11 12 13 14 15 16 17 18 19 20 21 22 23 24 25 26 27 28 29 30 31 32 33 34 35 global log /dev/log local0 log /dev/log local1 notice chroot /var/lib/haproxy user haproxy group haproxy daemon defaults log global mode http option httplog option dontlognull contimeout 5000 clitimeout 50000 srvtimeout 50000 errorfile 400 /etc/haproxy/errors/400 .http errorfile 403 /etc/haproxy/errors/403 .http errorfile 408 /etc/haproxy/errors/408 .http errorfile 500 /etc/haproxy/errors/500 .http errorfile 502 /etc/haproxy/errors/502 .http errorfile 503 /etc/haproxy/errors/503 .http errorfile 504 /etc/haproxy/errors/504 .http frontend http_front bind *:8080 stats uri /haproxy?stats default_backend http_back backend http_back balance roundrobin option httpchk GET /index.html option forwardfor header X-Forwarded-For server node1 192.168.56.102:80 check inter 2000 rise 3 fall 3 weight 30 server node2 192.168.56.103:80 check inter 2000 rise 3 fall 3 weight 30
5、执行脚本
1 2 ansible-playbook test.yml -i test_hosts --syntax-check ansible-playbook test.yml -i test_hosts
6、在客户机测试mysql -uroot -p -h 192.168.56.102
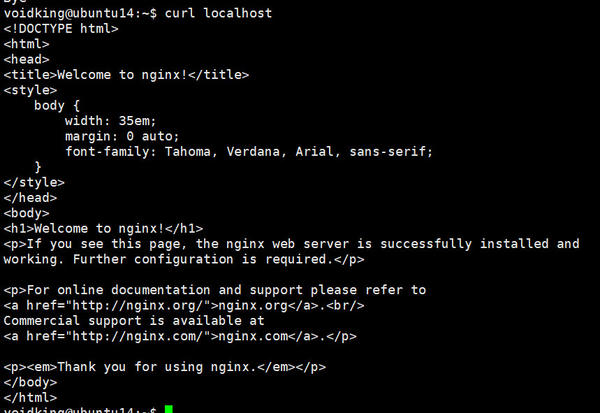
curl localhost
curl localhost:8080
4.8. 整合所有步骤1、执行脚本
1 2 ansible-playbook site.yml -i hosts --syntax-check ansible-playbook site.yml -i hosts
2、查看安装
1 2 3 curl 192.168.56.102 curl 192.168.56.103 curl 192.168.56.104:8080
4.9. 检查安装1、vim site.yml,修改为:
1 2 3 4 5 6 7 8 9 10 --- - hosts: all gather_facts: false roles: - 6_check
2、vim roles/6_check/tasks/main.yml,内容为:
1 2 3 4 5 6 7 --- - name: copy index.html template: src: ../templates/index.j2 dest: /usr/share/nginx/html/index.html force: yes when: install_nginx
3、vim roles/6_check/templates/index.j2,内容为:
1 2 3 4 5 6 7 8 9 10 <!DOCTYPE html > <html lang ="en" > <head > <meta charset ="UTF-8" > <title > Home Page</title > </head > <body > {{ ansible_eth0.ipv4.address }} </body > </html >
PS:查看变量ansible 192.168.56.102 -m setup > var.txt
4、执行脚本
1
2
ansible-playbook site.yml -i hosts --syntax-check ansible-playbook site.yml -i hosts
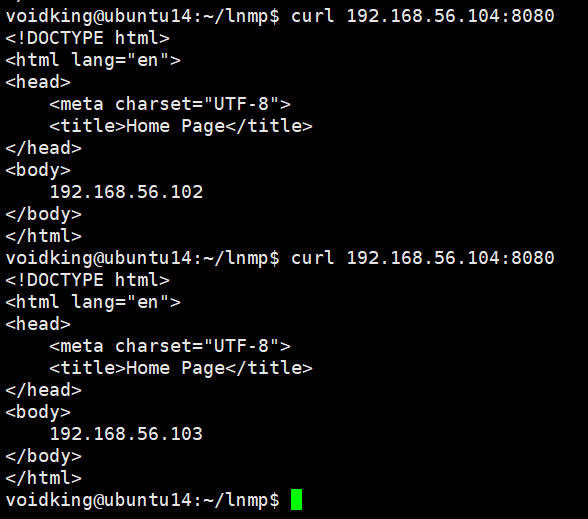
5、测试访问curl 192.168.56.104:8080
5. 源码分享项目地址:https://github.com/voidking/lnmp.git
6. 书签Ansible Documentation
Ansible中文权威指南
Ansible精讲
烂泥:高负载均衡学习haproxy之安装与配置
HAproxy 配置参数详解