1. Playbooks简介
与ad-hoc任务执行模式相比,Playbooks使用ansible是一种完全不同的方式,并且功能特别强大。
简而言之,playbooks是真正简单的配置管理和多机器部署系统的基础,与已有的系统不同,并且非常适合部署复杂的应用程序。
Playbooks可以声明配置,但它们也可以协调任何手动有序流程的步骤,即使不同的步骤必须按照特定顺序在机器组之间来回跳转。它们可以同步或异步启动任务。
更多playbooks的介绍参考官方文档。
Playbooks以YAML格式表示(请参阅YAML语法),具有最少的语法,它不是编程语言或脚本,而是配置或进程的模型。
每个剧本由列表中的一个或多个“戏剧”组成。戏剧的目标是将一组主机映射到一些定义明确的角色,由ansible调用任务表示。在基本级别,任务只不过是对ansible模块的调用(请参阅使用模块)。
通过编写多个“戏剧”的剧本,可以编排多机部署,在Web服务器组中的所有计算机上运行某些步骤,然后在数据库服务器组上执行某些步骤,然后在Web服务器组上执行更多命令,等等。。
你可以有很多戏剧影响你的系统做不同的事情。这并不是说你只是定义了一个特定的状态或模型,而是可以在不同的时间运行不同的戏剧。
2. Playbooks Demo
以下是只包含一个戏剧的剧本:
1
2
3
4
5
6
7
8
9
10
11
12
13
14
15
16
17
18
19
20
21
22
23
24
25
26
| ---
- hosts: webservers
vars:
http_port: 80
max_clients: 200
remote_user: root
tasks:
- name: ensure apache is at the latest version
yum:
name: httpd
state: latest
- name: write the apache config file
template:
src: /srv/httpd.j2
dest: /etc/httpd.conf
notify:
- restart apache
- name: ensure apache is running
service:
name: httpd
state: started
handlers:
- name: restart apache
service:
name: httpd
state: restarted
|
- 文件开头三个横杠代表yaml文件。
- hosts表示一个主机组。
- tasks表示动作集合。
- name是一个注释说明。
- yum和下面两行,表示使用yum安装最新版的httpd。
- template和下面两行,表示使用ansible的template模块传输/srv/httpd.j2作为客户机的/etc/httpd.conf。和copy相比,template支持jinja语法。
- notify和下面一行,表示传输成功后触发重启apache命令。它需要和handlers组合使用。
- handlers中的name和notify中的信息要完全相同。service和下面两行,表示重启httpd。
Playbooks可以包含多个戏剧。您可能有一个首先针对Web服务器,然后是数据库服务器的playbook。例如:
1
2
3
4
5
6
7
8
9
10
11
12
13
14
15
16
17
18
19
20
21
22
23
24
25
26
| ---
- hosts: webservers
remote_user: root
tasks:
- name: ensure apache is at the latest version
yum:
name: httpd
state: latest
- name: write the apache config file
template:
src: /srv/httpd.j2
dest: /etc/httpd.conf
- hosts: databases
remote_user: root
tasks:
- name: ensure postgresql is at the latest version
yum:
name: postgresql
state: latest
- name: ensure that postgresql is started
service:
name: postgresql
state: started
|
3. 入门实例
目标:编写一个playbook,在客户机上安装chrony,然后检查启动情况。
1、新建chrony.yml,内容为:
1
2
3
4
5
6
7
8
9
10
11
12
13
14
15
16
17
18
| ---
- hosts: commonservers
tasks:
- name: install chrony
apt:
name: chrony
state: latest
notify:
- restart chrony
- name: ensure chrony is running
service:
name: chrony
state: started
handlers:
- name: restart chrony
service:
name: chrony
state: restarted
|
上面的playbook中用到了apt模块,如果有疑问可以查看帮助,ansible-doc apt。实际上,有一种更加简单的写法,就是把apt模块换成command模块,然后直接写命令。
2、检查playbook
ansible-playbook chrony.yml --syntax-check
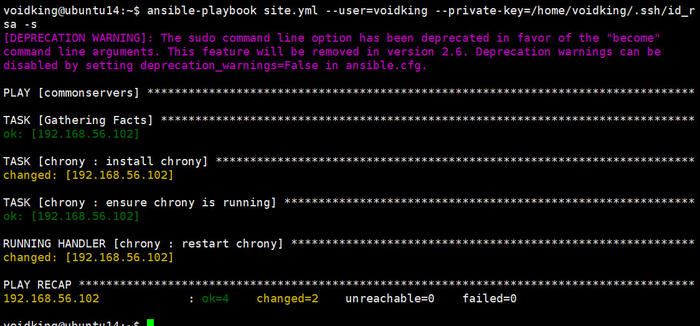
3、以sudo权限执行playbook
ansible-playbook chrony.yml --user=voidking --private-key=/home/voidking/.ssh/id_rsa -s

4、在客户机测试
chronyc sources

4. 角色
如果需要将一个大文件拆分为各个小文件,我们经常使用的就是include,这也是原先ansible拆分文件的做法。如今ansible使用roles来拆分文件,将nginx、mysql等分为各个角色,在各个角色内定义具体的小任务,方便管理。另一方面,类似于php类的自动加载,roles基于一个已知的文件结构,可以自动去加载某些vars_files、tasks、handlers等。
目标:使用角色的方式,编写配置playbook,在客户机上安装chrony,然后检查启动情况。
1、创建chrony角色目录
1
2
| mkdir -p roles/chrony/tasks
mkdir -p roles/chrony/handlers
|
2、创建总的入口文件site.yml,内容为:
1
2
3
4
| ---
- hosts: commonservers
roles:
- chrony
|
3、创建安装剧本
vim roles/chrony/tasks/main.yml,内容为:
1
2
3
4
5
6
7
8
9
10
11
| ---
- name: install chrony
apt:
name: chrony
state: latest
notify:
- restart chrony
- name: ensure chrony is running
service:
name: chrony
state: started
|
vim roles/chrony/handlers/main.yml,内容为:
1
2
3
4
5
| ---
- name: restart chrony
service:
name: chrony
state: restarted
|
4、以sudo权限执行playbook
ansible-playbook site.yml --user=voidking --private-key=/home/voidking/.ssh/id_rsa -s
5、在客户机测试
chronyc sources

5. 简单编程
5.1. 变量
1
2
3
4
5
6
7
8
9
10
11
12
13
| ---
- hosts: commonservers
vars:
pre1: all info is
pre2: hostname is
tasks:
- name: register vars
shell: hostname
register: info
- name: display info
debug: msg="{{pre1}} {{info}}"
- name: display hostname
debug: msg="{{pre2}} {{info.stdout}}"
|

这里涉及到一个知识点:使用ansible-playbook执行命令(使用shell/command模块),默认不显示标准输出/标准失败,只能看到执行成功还是失败。
如果想要显示标准输出/标准失败,必须要使用变量,就像上面的这个例子一样。
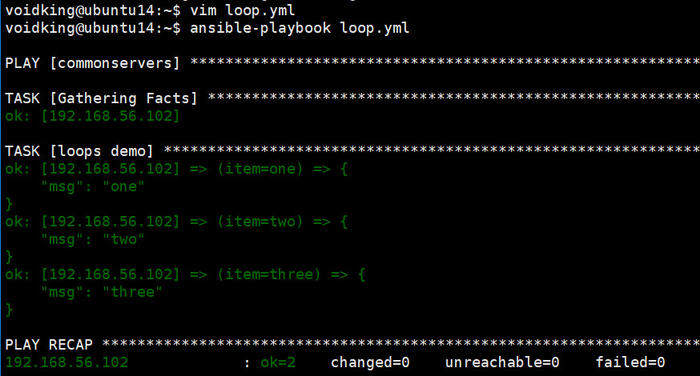
5.2. 基本循环
1
2
3
4
5
6
7
8
9
| ---
- hosts: commonservers
tasks:
- name: loops demo
debug: msg="{{item}}"
with_items:
- one
- two
- three
|
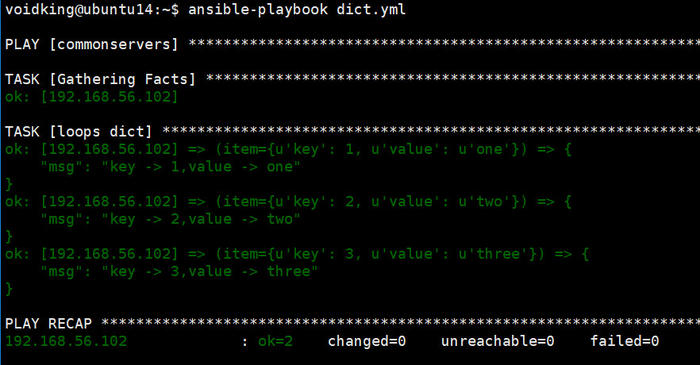
5.3. 循环字典
1
2
3
4
5
6
7
8
9
| ---
- hosts: commonservers
tasks:
- name: loops dict
debug: msg="key -> {{item.key}},value -> {{item.value}}"
with_items:
- {key: 1, value: "one"}
- {key: 2, value: "two"}
- {key: 3, value: "three"}
|
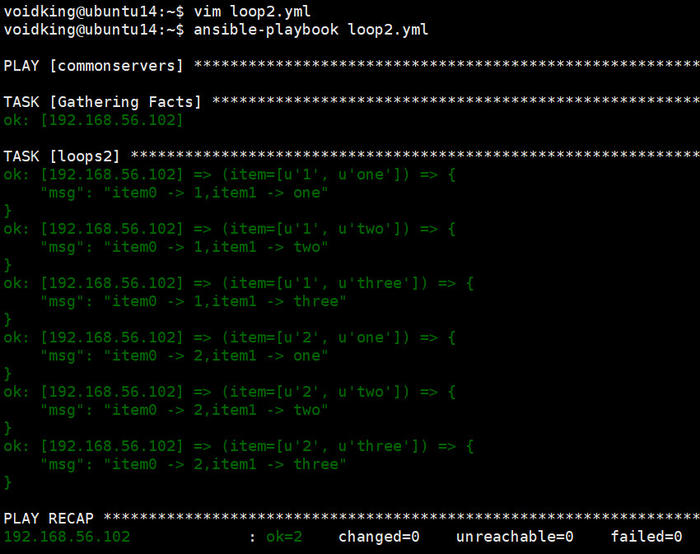
5.4. 嵌套循环
1
2
3
4
5
6
7
8
| ---
- hosts: commonservers
tasks:
- name: loops2
debug: msg="item0 -> {{item[0]}},item1 -> {{item[1]}}"
with_nested:
- ['1','2']
- ['one','two','three']
|
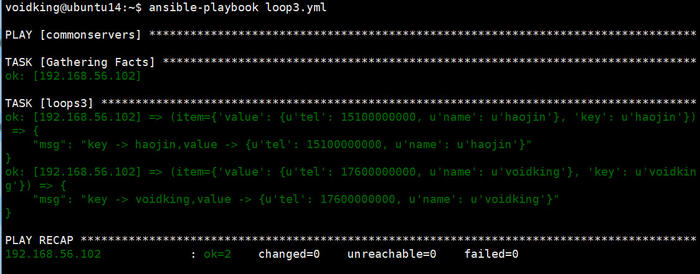
5.5. 散列循环
1
2
3
4
5
6
7
8
9
10
11
12
13
14
15
| ---
- hosts: commonservers
vars:
user:
voidking:
name: voidking
tel: 17600000000
haojin:
name: haojin
tel: 15100000000
tasks:
- name: loops3
debug: msg="key -> {{item.key}},value -> {{item.value}}"
with_dict:
- "{{user}}"
|
5.6. 文件循环
1
2
3
4
5
6
7
| ---
- hosts: commonservers
tasks:
- name: loop file
debug: msg="{{item}}"
with_fileglob:
- /home/voidking/*.yml
|

5.7. 命令循环
1
2
3
4
5
6
7
8
9
10
11
| ---
- hosts: commonservers
tasks:
- name: exec command
shell: "{{item}}"
with_items:
- hostname
- uname
register: ret
- name: display result
debug: msg="{% for i in ret.results %} {{i.stdout}} {% endfor %}"
|

5.8. 条件判断
ansible的条件判断使用关键字when,有两种方式:
- python语法支持的原生态格式 conditions > 1 or conditions == “ss”,in,not等等
- ansible Jinja2 filters
1
2
3
4
5
6
7
8
9
10
11
12
13
14
15
16
17
18
19
| ---
- hosts: commonservers
vars:
pre: hostname is
tasks:
- name: register vars
shell: hostname
register: info
- name: display hostname
debug: msg="{{pre}} {{info.stdout}}"
- name: print true
debug: msg="result is ubuntu14"
when: info.stdout == "ubuntu14"
- name: print false
debug: msg="result is not ubuntu14"
when: info.stdout != "ubuntu14"
- name: print warning
debug: msg="client OS is ubuntu"
when: info['stdout'].startswith('u')
|

6. 后记
至此,playbooks最基础的东西学习完毕。更高级的用法,在使用中再慢慢学习。
7. 书签