1. 前言
《CentOS7安装部署ELK》一文中,已经安装部署了ELK的基本架构,实现了Logstash收集客户节点数据,传递给Elasticsearch,然后显示在Kibana中。本文中,配置使用FileBeat来收集客户节点数据,然后分别传递给Logstash、Elasticsearch,最后配置使用Kibana仪表盘来显示FileBeat的数据。
2. Beats简介
Beats 平台集合了多种单一用途数据采集器。它们从成百上千或成千上万台机器和系统向 Logstash 或 Elasticsearch 发送数据。Packetbeat是最先出现的,用来收集网络数据。逐步衍生出了其他5个 Beats,分别是日志文件、系统信息、审计数据、Windows 系统日志和可用性监控,并且另外还有40多个社区维护的 Beats 来记录各种运营数据。
常见的Beats采集器包括:
- Filebeat:日志文件。
- Metricbeat:指标。
- Packetbeat:网络数据。
- Winlogbeat:Windows事件日志。
- Auditbeat:审计数据。
- Heartbeat:运行时间监控。
- Functionbeat:无需服务器的采集器。
更多内容参考Beats: Elasticsearch的数据采集器。
3. 配置Logstash
首先配置Logstash,使之能够接收Beats发送的数据。
1、拷贝模板到配置目录
1 | cp /etc/logstash/logstash-sample.conf /etc/logstash/conf.d/filebeat.conf |
2、编辑filebeat.conf
1 | vim /etc/logstash/conf.d/filebeat.conf |
filebeat.conf 修改为(实际上并不需要修改):
1 | input { |
3、检查配置
1 | /usr/share/logstash/bin/logstash --path.settings /etc/logstash -t |
4、启动logstash并设置开机自启动
1 | systemctl start logstash |
5、查看5044端口服务情况
1 | netstat -nlpt | grep 5044 |
找不到服务,哪里出了问题?没出啥问题,请等待3分钟以上,然后重新执行命令。
4. 安装FileBeat
参考Install Filebeat,安装FileBeat。
1、下载rpm安装包
1 | curl -L -O https://artifacts.elastic.co/downloads/beats/filebeat/filebeat-7.2.0-x86_64.rpm |
2、使用安装包安装FileBeat
1 | rpm -vi filebeat-7.2.0-x86_64.rpm |
3、查看FileBeat安装信息
1 | rpm -qi filebeat |

5. 配置FileBeat到Logstash
参考Configure Filebeat,配置FileBeat。
1、编辑filebeat.yml
1 | vim /etc/filebeat/filebeat.yml |
filebeat.yml如下修改:
1 | # line 24, change filebeat.input |
2、测试启动filebeat
1 | filebeat -e -c /etc/filebeat/filebeat.yml -d "publish" |
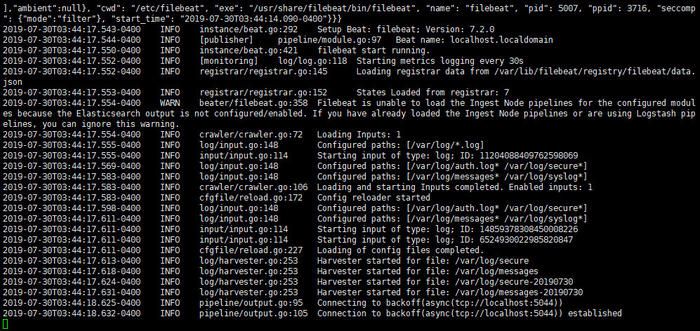
与logstash建立了连接,启动成功。
3、此时可以在ES中查看到索引
浏览器访问 http://192.168.56.101:9200/_cat/indices?v
4、查看filebeat收集的数据
浏览器访问 http://192.168.56.101:9200/filebeat-7.2.0-2019.07.30/_search?pretty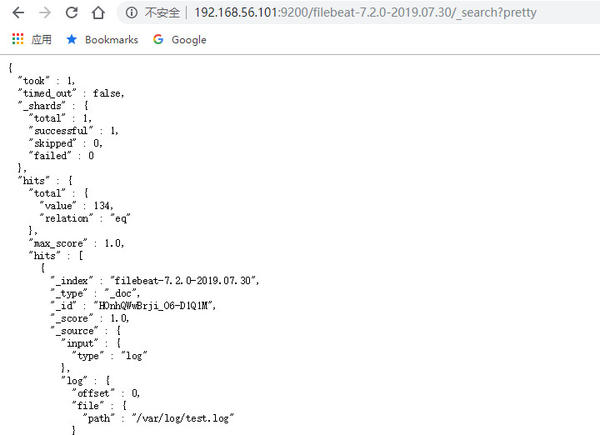
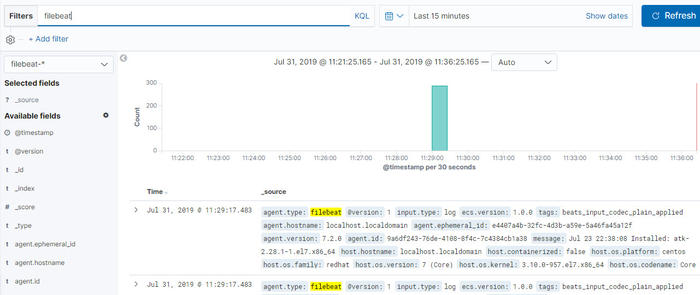
5、在kibana中查看日志数据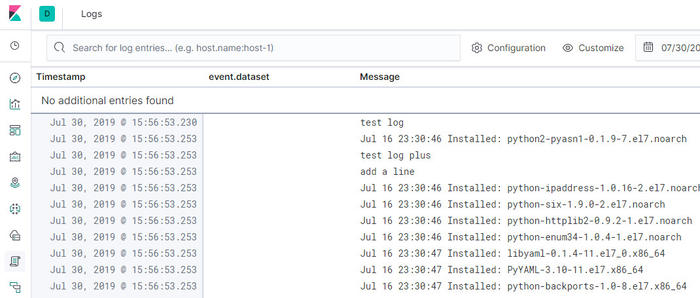
日志数据是/var/log/*.log,实际包括boot.log、yum.log和test.log。
6、查看并且启用filebeat modules
1 | filebeat modules list |
7、启动filebeat并设置开机启动
1 | systemctl start filebeat |
启用system module后,Kibana的event.dataset会多出system.syslog、system.auth。
PS:重建索引的方法
(1)删除索引
1 | curl -XDELETE -u elastic:changeme http://localhost:9200/filebeat-7.2.0-2019.07.30 |
(2)重建索引
删除registry/filebeat,然后重新启动filebeat。
8、更新test.log
在test.log中添加一行,FileBeat默认10秒reload一次文件,但是在ES中查询不到更新。神奇的是,在Kibana中可以查询到更新,不知道怎么肥四。留个坑,有缘再填。
6. 配置FileBeat到ES
1、编辑filebeat.yml
1 | vim /etc/filebeat/filebeat.yml |
filebeat.yml如下修改:
1 | # line 148 and 150, uncomment output.elasticsearch |
2、测试启动filebeat
1 | systemctl stop filebeat |
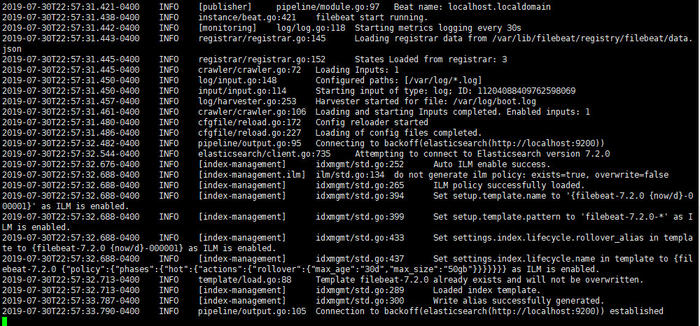
与ES建立了连接,启动成功。
3、此时可以在ES中查看到索引
浏览器访问 http://192.168.56.101:9200/_cat/indices?v
之后在ES和Kibana中查看数据的方法和上面相同。更新test.log,同样在ES中看不到,在Kibana中可以看到。
7. 配置FileBeat仪表盘
如果想要使用Filebeat提供的示例Kibana仪表盘,那么需要配置Kibana端点。如果Kibana与ES在同一主机上运行,则可以跳过此步骤。
1、编辑filebeat.yml
1 | vim /etc/filebeat/filebeat.yml |
filebeat.yml如下修改:
1 | # line 117 and 123, uncomment setup.kibana |
2、创建仪表盘
1 | filebeat setup --dashboards |

3、测试启动filebeat(不启动也可以)
1 | filebeat -e -c /etc/filebeat/filebeat.yml -d "publish" |
4、查看Kibana仪表盘
打开dashboard仪表盘,可以选择filebeat相关的仪表盘。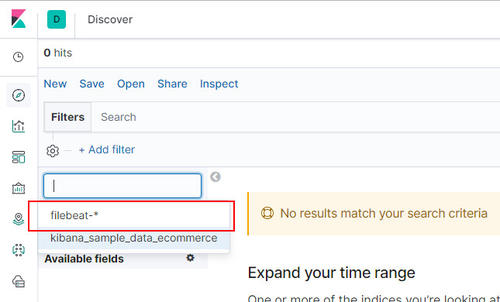
8. 后记
至此,安装配置完成了FileBeat,其收集的数据可以传递给Logstash,也可以直接传递给ES。创建了FileBeat的仪表盘,成功显示数据。