一个计算机技术爱好者与学习者

0%

好好学OpenStack:Ubuntu16手动安装OpenStack——openvswitch

1. 目标

《Ubuntu16手动安装OpenStack——实例访问外网》一文中,已经配置好了实例访问外网。但是仍有不足,因为我们看不到更详细网络信息,排查问题不方便。

本文,我们把linuxbridge-agent更换为openvswitch-agent,主要参考OpenStack Pike : Configure NeutronNeutron Configuration OptionsOpen vSwitch: Self-service networks

2. openvswitch简介

以下简介摘自openstack底层技术-使用openvswitch

在过去,数据中心的服务器是直接连在硬件交换机上,后来VMware实现了服务器虚拟化技术,使虚拟服务器(VMs)能够连接在虚拟交换机上。借助这个虚拟交换机,可以为服务器上运行的VMs或容器提供逻辑的虚拟的以太网接口,这些逻辑接口都连接到虚拟交换机上。有三种比较流行的虚拟交换机:VMware virtual switch,Cisco Nexus 1000V和Open vSwitch。

Open vSwitch(OVS)是运行在虚拟化平台上的虚拟交换机,其支持OpenFlow协议,也支持gre/vxlan/IPsec等隧道技术。在OVS之前,基于Linux的虚拟化平台比如KVM或Xen上,缺少一个功能丰富的虚拟交换机,因此OVS迅速崛起并开始在Xen/KVM中流行起来,并且应用于越来越多的开源项目,比如openstack neutron中的网络解决方案。

在虚拟交换机的Flow控制器或管理工具方面,一些商业产品都集成有控制器或管理工具,比如Cisco 1000V的Virtual Supervisor Manager(VSM),VMware的分布式交换机中的vCenter。而OVS则需要借助第三方控制器或管理工具实现复杂的转发策略。例如OVS支持OpenFlow协议,我们就可以使用任何支持OpenFlow协议的控制器来对OVS进行远程管理。OpenStack Neutron中的ML2插件也能够实现对OVS的管理。但这并不意味着OVS必须要有一个控制器才能工作。在不连接外部控制器情况下,OVS自身可以依靠MAC地址学习实现二层数据包转发功能,就像Linux Bridge。

在基于Linux内核的系统上,应用最广泛的还是系统自带的虚拟交换机Linux Bridge,它是一个单纯的基于MAC地址学习的二层交换机,简单高效,但同时缺乏一些高级特性,比如OpenFlow、VLAN tag、QOS、ACL、Flow等,而且在隧道协议支持上,Linux Bridge只支持vxlan,OVS支持gre/vxlan/IPsec等,这也决定了OVS更适用于实现SDN技术。

3. 控制节点

3.1. root用户

为了避免权限问题,建议切换到root用户进行操作(否则要加很多sudo)。
sudo -i

3.2. 卸载linuxbridge

在安装OVS之前,我们先删除实例和网络,卸载掉linuxbridge。

1、使admin环境生效
. admin-openrc

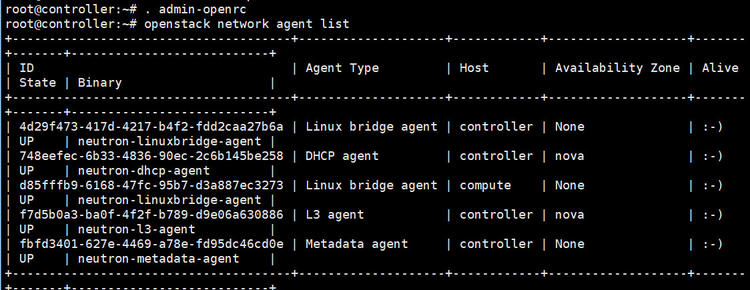
2、查看当前网络组件
openstack network agent list

3、在dashboard使用admin账户登录,依次删除实例、路由和网络。

4、卸载linuxbridge

1
2
3
systemctl disable neutron-linuxbridge-agent
systemctl stop neutron-linuxbridge-agent
apt remove -y neutron-plugin-linuxbridge-agent

5、查看当前网络组件
openstack network agent list

此时,controller节点上的Linux bridge agent已经从笑脸变成了XXX。

6、从数据库删除Linux bridge agent

1
2
3
4
Bridge=`openstack network agent list | grep 'Linux bridge agent'|awk '{print $2}'`
echo $Bridge
neutron agent-delete $Bridge
openstack network agent list

7、重新创建neutron数据库
mysql -uroot -p,密码为openstack。

1
2
drop database neutron;
create database neutron;

8、参考Ubuntu16手动安装OpenStack——neutron篇,创建好证书和服务端点。

3.3. 安装配置

1、安装相关组件

1
apt-get -y install neutron-server neutron-metadata-agent neutron-plugin-ml2 python-neutronclient

2、备份neutron.conf
mv /etc/neutron/neutron.conf /etc/neutron/neutron.conf.bak

3、vim /etc/neutron/neutron.conf,新建neutron.conf内容为:

1
2
3
4
5
6
7
8
9
10
11
12
13
14
15
16
17
18
19
20
21
22
23
24
25
26
27
28
29
30
31
32
33
34
35
36
37
38
39
40
41
42
43
44
[DEFAULT]
core_plugin = ml2
service_plugins = router
auth_strategy = keystone
state_path = /var/lib/neutron
dhcp_agent_notification = True
allow_overlapping_ips = True
notify_nova_on_port_status_changes = True
notify_nova_on_port_data_changes = True
# RabbitMQ connection info
transport_url = rabbit://openstack:openstack@controller

[agent]
root_helper = sudo /usr/bin/neutron-rootwrap /etc/neutron/rootwrap.conf

# Keystone auth info
[keystone_authtoken]
www_authenticate_uri = http://controller:5000
auth_url = http://controller:5000
memcached_servers = controller:11211
auth_type = password
project_domain_name = default
user_domain_name = default
project_name = service
username = neutron
password = openstack

# MariaDB connection info
[database]
connection = mysql+pymysql://neutron:openstack@controller/neutron

# Nova connection info
[nova]
auth_url = http://controller:5000
auth_type = password
project_domain_name = default
user_domain_name = default
region_name = RegionOne
project_name = service
username = nova
password = openstack

[oslo_concurrency]
lock_path = $state_path/tmp

4、更改权限
chmod 640 /etc/neutron/neutron.conf

chgrp neutron /etc/neutron/neutron.conf

5、vi /etc/neutron/metadata_agent.ini,如下修改:

1
2
3
4
5
6
# line 22: uncomment and specify Nova API server
nova_metadata_host = controller
# line 34: uncomment and specify any secret key you like
metadata_proxy_shared_secret = openstack
# line 260: uncomment and specify Memcache Server
memcache_servers = controller:11211

6、vi /etc/neutron/plugins/ml2/ml2_conf.ini,如下修改:

1
2
3
4
5
6
7
8
9
10
11
# line 129: add ( it's OK with no value for "tenant_network_types" (set later if need) )
[ml2]
type_drivers = flat,vlan,gre,vxlan
tenant_network_types =
mechanism_drivers = openvswitch,l2population
extension_drivers = port_security
# line 262: uncomment and add
enable_security_group = True
firewall_driver = neutron.agent.linux.iptables_firewall.OVSHybridIptablesFirewallDriver
# end line: uncomment
enable_ipset = True

7、vi /etc/nova/nova.conf,如下修改:

1
2
3
4
5
6
7
8
9
10
11
12
13
14
15
16
17
18
19
20
# add follows into [DEFAULT] section
use_neutron = True
linuxnet_interface_driver = nova.network.linux_net.LinuxOVSInterfaceDriver
firewall_driver = nova.virt.firewall.NoopFirewallDriver
vif_plugging_is_fatal = True
vif_plugging_timeout = 300

# add follows to the end : Neutron auth info
# the value of metadata_proxy_shared_secret is the same with the one in metadata_agent.ini
[neutron]
auth_url = http://controller:5000
auth_type = password
project_domain_name = default
user_domain_name = default
region_name = RegionOne
project_name = service
username = neutron
password = openstack
service_metadata_proxy = True
metadata_proxy_shared_secret = openstack

8、创建链接
ln -s /etc/neutron/plugins/ml2/ml2_conf.ini /etc/neutron/plugin.ini

9、生成数据库数据

1
su -s /bin/bash neutron -c "neutron-db-manage --config-file /etc/neutron/neutron.conf --config-file /etc/neutron/plugin.ini upgrade head"

10、重启neutron服务并设置开机启动

1
2
systemctl start neutron-server neutron-metadata-agent 
systemctl enable neutron-server neutron-metadata-agent

11、重启nova-api
systemctl restart nova-api

4. 网络节点

本文中,控制节点和网络节点是同一个节点。

1、安装相关组件

1
apt-get -y install neutron-plugin-ml2 neutron-plugin-openvswitch-agent neutron-l3-agent neutron-dhcp-agent neutron-metadata-agent python-neutronclient

2、备份neutron.conf
mv /etc/neutron/neutron.conf /etc/neutron/neutron.conf.bak

3、vim /etc/neutron/neutron.conf,新建neutron.conf如下:

1
2
3
4
5
6
7
8
9
10
11
12
13
14
15
16
17
18
19
20
21
22
23
24
25
26
[DEFAULT]
core_plugin = ml2
service_plugins = router
auth_strategy = keystone
state_path = /var/lib/neutron
allow_overlapping_ips = True
# RabbitMQ connection info
transport_url = rabbit://openstack:openstack@controller

[agent]
root_helper = sudo /usr/bin/neutron-rootwrap /etc/neutron/rootwrap.conf

# Keystone auth info
[keystone_authtoken]
www_authenticate_uri = http://controller:5000
auth_url = http://controller:5000
memcached_servers = controller:11211
auth_type = password
project_domain_name = default
user_domain_name = default
project_name = service
username = neutron
password = openstack

[oslo_concurrency]
lock_path = $state_path/lock

4、修改权限
chmod 640 /etc/neutron/neutron.conf

chgrp neutron /etc/neutron/neutron.conf

5、vi /etc/neutron/l3_agent.ini,如下修改:

1
2
3
4
# line 17: add
interface_driver = neutron.agent.linux.interface.OVSInterfaceDriver
# line 100: uncomment and change
external_network_bridge = br-eth2

6、vi /etc/neutron/dhcp_agent.ini,如下修改:

1
2
3
4
5
6
# line 17: add
interface_driver = neutron.agent.linux.interface.OVSInterfaceDriver
# line 28: uncomment
dhcp_driver = neutron.agent.linux.dhcp.Dnsmasq
# line 37: uncomment and change
enable_isolated_metadata = true

7、vi /etc/neutron/metadata_agent.ini,如下修改:

1
2
3
4
5
6
# line 22: uncomment and specify Nova API server
nova_metadata_host = controller
# line 34: uncomment and specify any secret key you like
metadata_proxy_shared_secret = openstack
# line 260: uncomment and specify Memcache Server
memcache_servers = controller:11211

8、vi /etc/neutron/plugins/ml2/ml2_conf.ini,如下修改:

1
2
3
4
5
6
7
8
9
10
11
# line 129: add ( it's OK with no value for "tenant_network_types" (set later if need) )
[ml2]
type_drivers = flat,vlan,gre,vxlan
tenant_network_types =
mechanism_drivers = openvswitch,l2population
extension_drivers = port_security
# line 262: uncomment and add
enable_security_group = True
firewall_driver = neutron.agent.linux.iptables_firewall.OVSHybridIptablesFirewallDriver
# end line: uncomment
enable_ipset = True

9、创建链接
ln -s /etc/neutron/plugins/ml2/ml2_conf.ini /etc/neutron/plugin.ini

10、重启openvswitch并设置开机启动

1
2
systemctl restart openvswitch-switch 
systemctl enable openvswitch-switch

11、创建网桥br-int
ovs-vsctl add-br br-int

12、重启相关服务并设置开机启动

1
2
3
4
for service in dhcp-agent l3-agent metadata-agent openvswitch-agent; do
systemctl start neutron-$service
systemctl enable neutron-$service
done

13、在控制节点查看neutron服务

1
2
. admin-openrc
openstack network agent list

5. 计算节点

5.1. root用户

为了避免权限问题,建议切换到root用户进行操作(否则要加很多sudo)。
sudo -i

5.2. 卸载linuxbridge

1、卸载linuxbridge

1
2
3
systemctl disable neutron-linuxbridge-agent
systemctl stop neutron-linuxbridge-agent
apt remove -y neutron-plugin-linuxbridge-agent

2、控制节点查看当前网络组件
openstack network agent list

3、从数据库删除Linux bridge agent

1
2
3
4
Bridge=`openstack network agent list | grep 'Linux bridge agent'|awk '{print $2}'`
echo $Bridge
neutron agent-delete $Bridge
openstack network agent list

5.3. 安装配置

1、安装相关组件

1
apt-get -y install neutron-common neutron-plugin-ml2 neutron-plugin-openvswitch-agent

2、备份neutron.conf
mv /etc/neutron/neutron.conf /etc/neutron/neutron.conf.bak

3、vim /etc/neutron/neutron.conf,新建neutron.conf如下:

1
2
3
4
5
6
7
8
9
10
11
12
13
14
15
16
17
18
19
20
21
22
23
24
25
26
[DEFAULT]
core_plugin = ml2
service_plugins = router
auth_strategy = keystone
state_path = /var/lib/neutron
allow_overlapping_ips = True
# RabbitMQ connection info
transport_url = rabbit://openstack:openstack@controller

[agent]
root_helper = sudo /usr/bin/neutron-rootwrap /etc/neutron/rootwrap.conf

# Keystone auth info
[keystone_authtoken]
www_authenticate_uri = http://controller:5000
auth_url = http://controller:5000
memcached_servers = controller:11211
auth_type = password
project_domain_name = default
user_domain_name = default
project_name = service
username = neutron
password = openstack

[oslo_concurrency]
lock_path = $state_path/lock

4、修改权限
chmod 640 /etc/neutron/neutron.conf

chgrp neutron /etc/neutron/neutron.conf

5、vi /etc/neutron/plugins/ml2/ml2_conf.ini,如下修改:

1
2
3
4
5
6
7
8
9
10
11
# line 129: add ( it's OK with no value for "tenant_network_types" (set later if need) )
[ml2]
type_drivers = flat,vlan,gre,vxlan
tenant_network_types =
mechanism_drivers = openvswitch,l2population
extension_drivers = port_security
# line 262: uncomment and add
enable_security_group = True
firewall_driver = neutron.agent.linux.iptables_firewall.OVSHybridIptablesFirewallDriver
# end line: uncomment
enable_ipset = True

6、vi /etc/nova/nova.conf,如下修改:

1
2
3
4
5
6
7
8
9
10
11
12
13
14
15
16
17
18
19
20
# add follows into [DEFAULT] section
use_neutron = True
linuxnet_interface_driver = nova.network.linux_net.LinuxOVSInterfaceDriver
firewall_driver = nova.virt.firewall.NoopFirewallDriver
vif_plugging_is_fatal = True
vif_plugging_timeout = 300

# add follows to the end : Neutron auth info
# the value of metadata_proxy_shared_secret is the same with the one in metadata_agent.ini
[neutron]
auth_url = http://controller:5000
auth_type = password
project_domain_name = default
user_domain_name = default
region_name = RegionOne
project_name = service
username = neutron
password = openstack
service_metadata_proxy = True
metadata_proxy_shared_secret = openstack

7、创建链接
ln -s /etc/neutron/plugins/ml2/ml2_conf.ini /etc/neutron/plugin.ini

8、重启openvswitch并设置开机启动

1
2
systemctl restart openvswitch-switch 
systemctl enable openvswitch-switch

9、创建网桥br-int
ovs-vsctl add-br br-int

10、重启nova-compute服务
systemctl restart nova-compute

11、重启neutron-openvswitch-agent并设置开机启动

1
2
systemctl restart neutron-openvswitch-agent 
systemctl enable neutron-openvswitch-agent

13、在控制节点查看neutron服务

1
2
. admin-openrc
openstack network agent list


可以看到,新添加了compute节点的Open vSwitch agent。

至此,openvswitch安装配置完成。