1. 目标
紧接着《Ubuntu16手动安装OpenStack——cinder篇》,本文,我们来研究一下swift的安装配置。主要参考OpenStack Queens : Configure Swift 和 Object Storage Install Guide。
cinder和swift都是关于存储的组件,那么它们有什么区别呢?
cinder的存储,就像是普通硬盘。可以方便快捷地本地存取修改数据,还可以按需添加减少硬盘。
swift的存储,就像是百度云盘。只能存取数据,不能在云端进行修改,适用于备份。如果非要修改,那么需要下载到本地修改,修改完再上传。在openstack实际应用中,swift常用来存储镜像这种不需要经常修改的文件。
2. swift简介
OpenStack Object Storage 是一个多租户对象存储系统。它具有高度可扩展性,可以通过RESTful HTTP API以低成本管理大量非结构化数据。
代理服务器(swift-proxy-server)
接受OpenStack Object Storage API和原始HTTP请求,上传文件,修改元数据和创建容器。它还为Web浏览器提供文件或容器列表。为了提高性能,代理服务器可以使用通常使用memcache部署的可选缓存。
帐户服务器(swift-account-server)
管理使用对象存储定义的帐户。
容器服务器(swift-container-server)
在对象存储中管理容器或文件夹的映射。
对象服务器(swift-object-server)
管理存储节点上的实际对象,例如文件。
Various periodic processes
在大型数据存储上执行内务处理任务。复制服务可确保群集的一致性和可用性。其他定期流程包括审计员,更新者和收割者。
WSGI中间件
处理身份验证,通常是OpenStack Identity。
swift client
允许用户通过命令行客户端进行授权,然后为admin用户、经销商用户或swift用户向REST API提交命令。
swift-init
初始化环文件构建的脚本,将守护程序名称作为参数并提供命令。详细文档在这里。
swift-recon
一种客户端工具,用于检索由swift-recon中间件收集的有关群集的各种指标和遥测信息。
swift-ring-builder
存储环构建和重新平衡实用程序。详细文档在这里。
3. 架构
一般来说,swift至少需要三个存储节点,如下结构。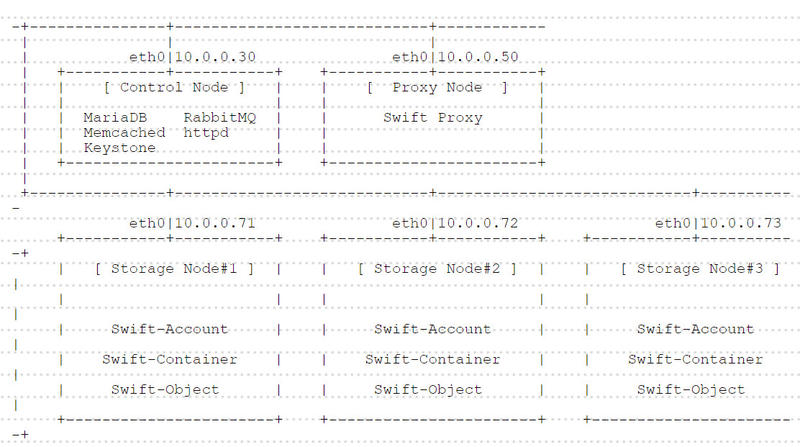
之前的安装中,我们只使用了两个节点,一个控制节点,一个计算节点。本文中,我们把swift安装在控制节点和计算节点,领会精神。如果要增加存储节点,修改Ring files,然后参照计算节点配置即可。
控制节点安装:
1 | Swift Proxy |
计算节点安装:
1 | Swift Proxy |
4. 控制节点
4.1. root用户
为了避免权限问题,建议切换到root用户进行操作(否则要加很多sudo)。sudo -i
4.2. 服务证书和端点
1、使admin环境生效. admin-openrc
2、添加swift用户openstack user create --domain default --project service --password openstack swift
3、把admin角色添加给swift用户openstack role add --project service --user swift admin
4、创建swift服务openstack service create --name swift --description "OpenStack Object Storage" object-store
5、创建服务端点
1 | openstack endpoint create --region RegionOne object-store public http://controller:8080/v1/AUTH_%\(tenant_id\)s |
4.3. 安装配置Swift Proxy
1、安装swift-proxyapt-get -y install swift swift-proxy python-swiftclient python-keystonemiddleware python-memcache
2、创建swift配置目录mkdir /etc/swift
3、vi /etc/swift/proxy-server.conf,新建proxy-server.conf内容如下:
1 | # create new |
4、vi /etc/swift/swift.conf,新建swift.conf内容为:
1 | # create new (it is shared among Swift Nodes - any words you like) |
5、修改权限chown -R swift. /etc/swift
4.4. 配置Ring files
1、创建rings
1 | swift-ring-builder /etc/swift/account.builder create 12 2 1 |
12、2、1这三个参数,分别代表part_power、replicas、min_part_hours。
part_power是以2为底数的指数的幂,即2^ part_power,所得的值表示总共的partition的数目。如果设置为2,则2^2=4,表示总共有4个partition。
replicas表示每个object在swift中储存的数目。
min_part_hours表示一个partiton能够再次更改的最小时间。防止没有进行同步便进行下次更改。
2、添加存储节点
1 | swift-ring-builder /etc/swift/account.builder add r0z0-172.16.0.105:6002/device0 100 |
3、平衡存储
1 | swift-ring-builder /etc/swift/account.builder rebalance |
4、更改权限chown swift. /etc/swift/*.gz
5、重启swift-proxysystemctl restart swift-proxy
5. 计算节点
5.1. root用户
为了避免权限问题,建议切换到root用户进行操作(否则要加很多sudo)。sudo -i
5.2. 磁盘分区
1、《Ubuntu16手动安装OpenStack——cinder篇》一文中,因为计算节点(存储节点)的sdb用于cinder服务了,所以我们需要在计算节点再添加一块硬盘sdc,用于swift服务。
2、查看硬盘fdisk -l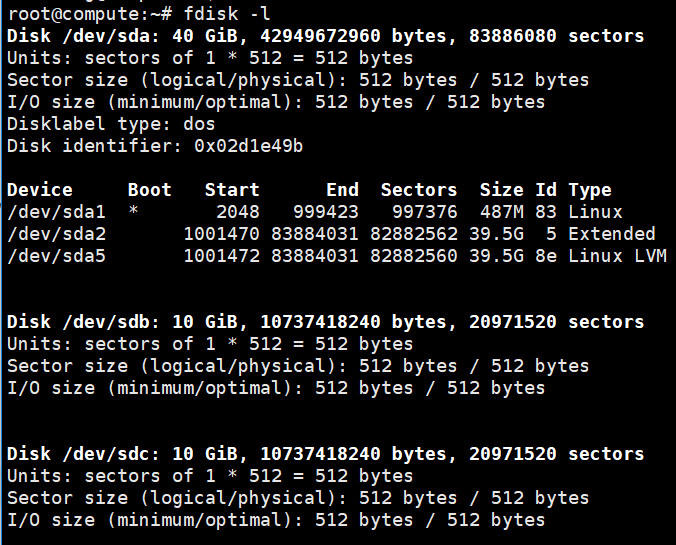
3、对sdc进行分区fdisk /dev/sdc
- 输入 m 显示所有命令提示。
- 输入 p 显示硬盘分割情形。
- 输入 a 设定硬盘启动区。
- 输入 n 设定新的硬盘分割区。输入 e 硬盘为[延伸]分割区(extend),输入 p 硬盘为[主要]分割区(primary)。
- 输入 t 改变硬盘分割区属性。
- 输入 d 删除硬盘分割区属性。
- 输入 q 结束不存入硬盘分割区属性。
- 输入 w 结束并写入硬盘分割区属性。
4、命令行输入n,添加一个新的分区;接下来选择p,设置一个主分区(e为扩展分区);接下来分区号选择1;再接下来设置起止扇区号,选择默认值即可(2048到max);最后输入w,确认写入硬盘分区。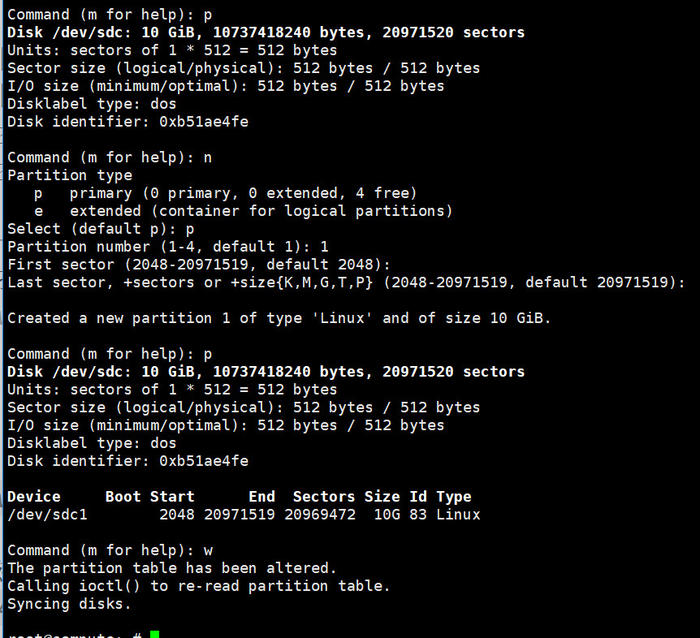
5.3. 安装配置
1、下载安装相关组件apt-get -y install swift swift-account swift-container swift-object xfsprogs
2、使用xfs格式化空闲磁盘mkfs.xfs -i size=1024 -s size=4096 /dev/sdc1
3、创建device1文件夹mkdir -p /srv/node/device1
4、挂载/dev/sdc1到device1mount -o noatime,nodiratime,nobarrier /dev/sdc1 /srv/node/device1
5、修改权限chown -R swift. /srv/node
6、vi /etc/fstab,设置开机挂载
1 | # add to the end |
7、从控制节点(swift-proxy)拷贝文件到计算节点scp voidking@172.16.0.105:/etc/swift/*.gz /etc/swift/
8、修改权限chown swift. /etc/swift/*.gz
9、vi /etc/swift/swift.conf,新建swift.conf内容如下:
1 | # set the value which is set on Proxy Node |
10、vi /etc/swift/account-server.conf,如下修改:
1 | # line 2: make sure the value is follows |
11、vi /etc/swift/container-server.conf,如下修改:
1 | # line 2: make sure the value is follows |
12、vi /etc/swift/object-server.conf,如下修改:
1 | # line 2: make sure the value is follows |
13、vi /etc/rsyncd.conf,新建rsyncd.conf内容如下:
1 | # create new |
14、vi /etc/default/rsync,如下修改:
1 | # line 8: change |
15、重启rsync并设置开机启动systemctl restart rsync
systemctl enable rsync
16、重启其他swift服务并设置开机启动
1 | for ringtype in account container object; do |
至此,一个存储节点配置成功,下面再配置一个swift存储节点在控制节点上。
6. 控制节点
6.1. root用户
为了避免权限问题,建议切换到root用户进行操作(否则要加很多sudo)。sudo -i
6.2. 磁盘分区
1、在控制节点再添加一块硬盘sdb,用于swift服务。
2、参考计算节点的分区方法,给sdb分区。
6.3. 安装配置
1、下载安装相关组件apt-get -y install swift swift-account swift-container swift-object xfsprogs
2、使用xfs格式化空闲磁盘mkfs.xfs -i size=1024 -s size=4096 /dev/sdb1
3、创建device0文件夹mkdir -p /srv/node/device0
4、挂载/dev/sdc1到device1mount -o noatime,nodiratime,nobarrier /dev/sdb1 /srv/node/device0
5、修改权限chown -R swift. /srv/node
6、vi /etc/fstab,设置开机挂载
1 | # add to the end |
7、修改权限chown swift. /etc/swift/*.gz
8、vi /etc/swift/account-server.conf,如下修改:
1 | # line 2: make sure the value is follows |
9、vi /etc/swift/container-server.conf,如下修改:
1 | # line 2: make sure the value is follows |
10、vi /etc/swift/object-server.conf,如下修改:
1 | # line 2: make sure the value is follows |
11、vi /etc/rsyncd.conf,新建rsyncd.conf内容如下:
1 | # create new |
12、vi /etc/default/rsync,如下修改:
1 | # line 8: change |
13、重启rsync并设置开机启动systemctl restart rsync
systemctl enable rsync
14、重启其他swift服务并设置开机启动
1 | for ringtype in account container object; do |
至此,控制节点的swift存储也配置完成。
7. 使用
以下操作在控制节点执行。
7.1. 服务角色和用户
1、使admin环境生效. admin-openrc
2、创建一个swiftservice服务openstack project create --domain default --description "Swift Service Project" swiftservice
3、创建SwiftOperator角色openstack role create SwiftOperator
4、创建user01用户,密码为openstackopenstack user create --domain default --project swiftservice --password openstack user01
5、给user01添加SwiftOperator角色openstack role add --project swiftservice --user user01 SwiftOperator
7.2. 客户端
1、安装swift-clientapt-get -y install python-openstackclient python-keystoneclient python-swiftclient
2、vi ~/swift-openrc,创建环境配置文件swift-openrc,内容为:
1 | export OS_PROJECT_DOMAIN_NAME=default |
3、使环境生效. swift-openrc
4、查看swift状态swift stat
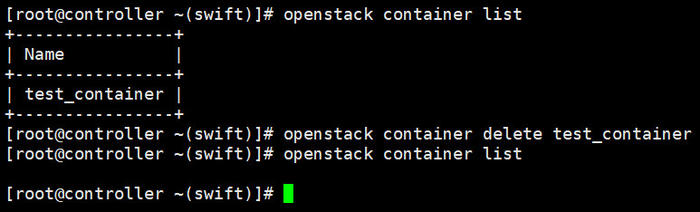
5、创建一个containeropenstack container create test_container
openstack container list
6、vim test.txt,新建test.txt,内容为“hello openstack”。
7、上传test.txt文件到test_containeropenstack object create test_container test.txt
8、查看test_container中的文件openstack object list test_container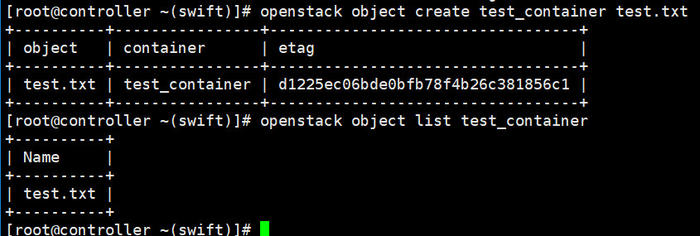
9、下载test.txt文件
1 | rm test.txt |
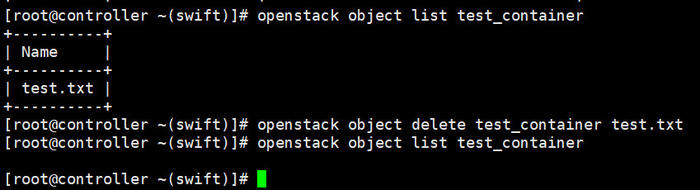
10、删除test_container中的test.txt文件
1 | openstack object list test_container |
11、删除test_container
1 | openstack container list |