1. VSCode简介
JetBrains 全家桶非常好用,但是每年 $249 的价格,直接劝退了。然后,VSCode(Visual Studio Code)就成了最好的选择。
VSCode 是一个轻量但功能强大的代码编辑器,适用于 Windows、macOS 和 Linux。它内置了对 JavaScript、TypeScript 和 Node.js 的支持,并为其他语言(如 C++、C#、Java、Python、PHP、Go)和运行时(如 .NET 和 Unity)提供了丰富的扩展生态系统。
本文记录一下 VSCode 常用的一些快捷键和配置,备忘。
2. 快捷键
2.1. 查看快捷键
左下角齿轮(Manage),Keyboard Shortcuts
VSCode的很多快捷键和sublime相同,这个必须点赞。sublime快捷键参考《Sublime Text3》。
2.2. 全局搜索
command-shift-F
2.3. 选择相同内容
选中一部分内容后,command-D可以选中相同内容,进行批量操作,比如print变log。
配合command-左右键,可以批量操作上一行下一行,比如print所在行跳转到行尾,下面一行添加log。
2.4. 同列多行编辑
command-option-上下键
sublime中使用control-shift-上下键
2.5. 自动补全函数返回值
尚未找到解决办法。
想要像《IDEA常用快捷键和配置》一文中的IDEA快捷键一样,自动补全函数返回值,但是尚未找到解决办法。
2.6. 函数跳转
command-单击:跳转函数定义,或跳转函数引用control-减号:跳回之前位置
对于golang,需要先安装gopls插件,然后重启VSCode,否则无法实现函数跳转。
1 | go install golang.org/x/tools/gopls@latest |
2.7. 代码格式化
option-shift-F
对于Python代码,第一次执行会提示安装autopep8,安装即可。
1 | pip install autopep8 |
2.8. Python保存文件时自动格式化
Code,Preferences,Settings,Text Editor,Formatting,勾选Format On Save。
或者打开全局配置文件,添加配置:
1 | { |
当 command-S 保存文件时,会自动执行一次代码格式化。
指定使用autopep8进行代码格式化:
1 | { |
更多配置参考文档Formatting Python in VS Code
3. 配置
3.1. 打开全局配置文件
command-shift-P,输入settings.json,选择Open User Settings
3.2. 打开当前项目配置文件
当前项目配置文件的优先级,高于全局配置文件。
方法一:
直接打开 .vscode/settings.json 文件
方法二:command-shift-P,输入settings.json,选择Open Workspace Settings
3.3. terminal配置
Code,Preferences,Settings,User,Features,Terminal
3.4. 设置terminal背景颜色
打开Settings,搜索workbench.colorCustomizations,点击 Edit in settings.json
添加如下内容:
1 | { |
3.5. 解决terminal中文乱码问题
vscode中使用terminal时发现中文乱码,echo $LANG查看locale,值为zh_HANS_cn.UTF-8,需要改成zh_CN.UTF-8。
1 | vim ~/.zshrc |
添加:
1 | export LANG=zh_CN.UTF-8 |
3.6. 设置terminal缓存行数
打开Settings,搜索 scrollback,找到 Termial > Integrated: Scollback,行数改为 100000
3.7. 显示大纲视图
View,Open View…,view outline
3.8. 安装插件
左侧边栏,Extensions,搜索插件安装即可。
插件配置方法:Code,Preferences,Settings,搜索插件名称。
3.9. 粘贴时正确缩进
复制一整块代码进行粘贴时,缩进往往不对,需要手动调整,这点还是jetbrains好用。
不过好在vscode插件很多,“Paste and Indent”这个插件就能解决这个问题。
1、安装“Paste and Indent”
2、command-shift-P,打开命令面板。
3、输入keyboard,选择 References: Open Keyboard Shortcuts(JSON)
4、编辑 keybindings.json,填入内容为
1 | // Place your key bindings in this file to override the defaults |
重启vscode,复制粘贴时,使用ctrl+v就能够自动缩进了。
但是,ctrl+v有时候的表现反而不如常规粘贴(cmd+v),这时可以使用cmd+z进行撤销,就变成了常规粘贴的效果。
这个插件的原理应该是先进行了常规的粘贴,然后进行了缩进格式化,因此cmd+z可以还原常规粘贴的效果。
3.10. Python代码检查
参考文档:《Python代码质量检查》
3.11. 设置Python代码片段
1、打开代码片段配置
Code,Preferences,User Snippets,选择Python
此时会打开一个python.json文件,这就是代码片段模板配置文件。不止可以配置文件头部注释,还可以配置通用内容。
2、填入代码片段配置
百度风格的Python Header Docstring:
1 | { |
谷歌风格的Python Header Docstring:
1 | { |
参考文档:
- What is the common header format of Python files?
- Google Python Style Guide - Comments and Docstrings
- Snippets in Visual Studio Code - Variables
3、使用代码片段
新建Python文件,文件头部不会出现注释。
输入pythonheader,根据提示回车,就会自动添加注释了。
这种用法和sublime的Emmet插件很像,!+tab自动生成html5框架。
3.12. 设置Golang代码片段
1 | { |
参考文档:
3.13. 自动生成Docstring
1、安装插件 autoDocstring - Python Docstring Generator
2、使用 autoDocstring
在某个函数名下面的第一行,输入command+shift+2,就会自动添加Docstring模板
或者右键,选择Generate Docstring,就会自动添加Docstring模板
默认是风格是google python style,一般不用修改。
修改风格的方法:Code,Preferences,Settings,搜索autoDocstring,找到Auto Docstring: Docstring Format,选择其他风格(例如pep257)。
参考文档:《Python代码风格指南》
3.14. git分支代码比较
git分支代码比较合并,JetBrains中的Show Diff with Working Tree非常好用。vscode上没有能够完美替代这个功能的插件,gitlens只能算差强人意。
1、安装gitlens插件
2、左边栏显示gitlens插件command-shift-P,打开命令面板。
输入gitlenss,找到 Gitlens: Set Views Layout,点击它。
选择Gitlens Layout,这时gitlens插件就会显示在左边栏。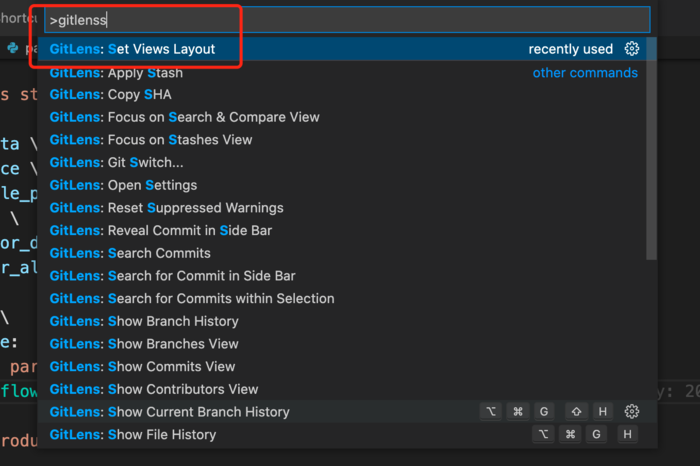
3、选择分支进行比较
点击gitlens插件,BRANCHS,当前分支会有一个对号。
选中想要对比的分支,option+单击,Compare with Working Tree就会出现在 SEARCH&COMPARE。
4、代码比较
SEARCH&COMPARE,选中Comparing Working…,点击Swap Comparison,让当前代码放在左边(个人习惯)。
x files changed中点击那些存在diff的文件,就可以愉快地进行代码比较了。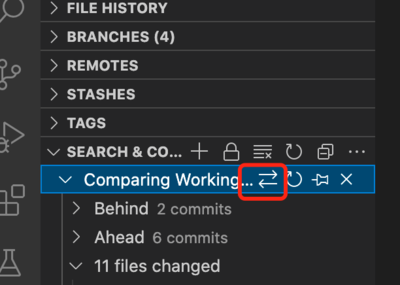
5、代码合并
根据左右两边代码的不同,自行修改左边的代码。
和JetBrains相比,本插件最大的缺点是不能通过快捷按钮修改左边的代码。
3.15. git commit比较
需求:比较当前commit和上一个commit的差异。
比较方法:
1、打开文件
2、点击右上角 Open Changes with Previous Revision
如果想继续比较上一个commit和上上一个commit的差异,可以继续点击 Open Changes with Previous Revision
4. 问题记录
4.1. 无法连接主机问题
问题描述:vscode连接主机,原本正常,突然出现报错。
1 | The remote host may not meet vs code server's prerequisites for glibc and libstdc++ |
参考文档:
- The remote host may not meet vs code server’s prerequisites for glibc and libstdc++ vscode
- The remote host may not meet VS Code Server’s prerequisites for glibc and libstdc++
根据文档中的描述,这个问题是由于vscode新版本bug引起的。查看自己的vscode版本,是1.99.x,确实是最近一周内更新的,那么大概率是vscode版本问题了。
解决办法:vscode降级,降级到 1.98.x。
1、下载低版本vscode:https://code.visualstudio.com/updates/v1_98
2、退出vscode,安装低版本vscode
vscode降级后,问题解决。